Wednesday, November 17, 2010

geopaparazzi 1.2.0 released

Today we released geopaparazzi 1.2.0 just in time for our GFOSS.it conference lab and presentations

So the features and fixes that got into the release are:

New features
* audio recording button
* the panic button (send sms with position update to a preconfigured phone number)
* added gps exif tags into the pictures taken

New Localization:
* added Sinhala translation

Fixes:
* sms catcher was crashing when application not in foreground

And the mandatory screenshot:


Tested phones are listed here.

Saturday, November 13, 2010

geopaparazzi gets the PANIC! button

In the upcoming release of geopaparazzi there will be three main additions:

1) the Sinhala translation
2) the possibility to not only take pictures and georeference them, but also recorded audio

and...

3) the PANIC! button


What would that be? Well, I figured out that my bussiness partner would use it for surveying, my dad would use it to trace mushrooms places somewhere off the track and my girlfriend would use it to log her infinite mountainbike trips. We wanted something that would send out the current position to a preconfigured telephone number with a simple click in the case of problems. Well, that's all that it does... push the button, push push the button! :)

Friday, November 12, 2010

uDig styles and filters - human readable... the fun is on!!!

You might remember my post about udig and filters, where I stated that filters were given in xml form. Well, thanks to a good comment of Andrea Aime, I tried a simple tweak and now we have filters in a simple and easy human readable form, supporting the amazing power of geotools' filter mechanics.
Thank God those guys exist :)

An example?

I have a map with rivers in it:


Now I want to create a rule that only displays those rivers that are longer than 2000 meters. The CQL function length comes to help me. Insert it into the filter textbox, press the apply button and here we go:


It is easy now to add in another rule and color those that are shorter than 2000 meters:


Nice ha? coming in your next uDig release :)


PS: some examples from the geotools site.

Thursday, November 4, 2010

Install JGrass on uDig 1.2

It is now more than one week that the JGrass site is down and our providers are not able to get it up again, I am going to post a very short workaround for people that want to install JGrass and get started anyways.

So first get the newest version by installing uDig 1.2 from the main download site. Make sure to download version 1.2.

Then install the latest JGrass plugins in uDig. There is a great presentation by Silvia that explains how to do that:
Have a look at the first slides to see how to do the install. The only thing that changes is that in this version of uDig the urls of the update sites are missing. So, when it comes to the slide 9, you will have nothing and will have to add a new remote site. This is simply done by pushing that button and adding the following url into it:

http://udig.refractions.net/files/update/1.2/community/

It should then look like the following:


At that point you can follow back the slides.


If you need an introduction on the use of JGrass, follow the presentation until its end.

Tuesday, November 2, 2010

Geopaparazzi 1.1.1 released

Today we released Geopaparazzi 1.1.1 to the android market. Some info:

New features:

  • SMS catcher for finding surveyor through an sms
  • better handling of gps log names
  • better note insertion gui

New Localization:

  • added Spanish translation (thanks Camilla Archetti)
  • added Finnish translation (thanks Juha Valtanen)
  • added German translation (thanks Matthias Lendholt)

Fixes:

  • fixed small delay in getting the old gps data on screen rotation
  • gps log list sorted to have most recent on top


You have wishes for new features? Add them here.

Monday, November 1, 2010

uDig styles and filters

When it comes to filters in SLD it gets really hairy. Filters can be really everything, from an constant value to a complex nested operation on properties. It is one of those things with superpowers but also scary when it comes to the moment to create a gui for it.

So what we decided to do for now, is to expose the pieces of xml that represents the filter part in a rule. Sure it is only for the brave, but even if you do not edit it, you can at least get some useful info out of it.

Let's for example start with a themed style with only two classes:


if you go to the simple polygon style panel now, you will find a new tab, which states Filter. Inside that you now find the current filter definistion (if one is in).


In this case it gets how the themed styles work, right? As highlighted in the following screenshot, the filter states that the first rule is applied if:
* the property POP_CNTRY >= 0
* AND
* the property POP_CNTRY < 50000

That is how themed style works. A set of rules is created with filters in a row.


You may have noticed that some countries have disappeared in the previous image. That is because in the previous image I changed the upper limit of the first rule to 50000, while it was different in the first screenshots.

So you really can modify the filter as you which. You have then to make sure you push the Apply Filter button. At that point the filter will replace the previous filter in the style.

Just to give you one more example of what you can do, here is how normalization works. Imagine you want to style the population attribute, but normalized on the area, so that it gives a better idea of population density. That is how to change the filter for it:


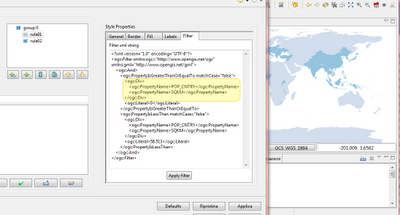
What you are saying now is that the first rule is applied if:
* the property POP_CNTRY divided by the property SQKM is >= 0
* AND
* the property POP_CNTRY divided by the property SQKM is < 58.513

One last hint though. Don't do this by hand, in uDig for doing normalization we have a button on the themed style page :)