Monday, June 30, 2008

How to do console queries

I have a postgresql database with a rainfall table in it.

Doing a straight query to it from psql shell would look like:


and would gain the result:


From the JGrass console we can do something similar with the following script:


String startDate = "2006-09-08 02:00";
String endDate = "2006-09-08 05:00";

jgrass {
db.query
--query "select t.dataora, t.valore from punti_monitoraggio p, metadati m, serie_temporali t where p.id_punti_monitoraggio = 1101 and p.id_punti_monitoraggio=m.punti_monitoraggio_id and t.metadati_id=m.id and m.tipologia_serie_temporali_id=2 and t.intervallo = 30 and t.dataora BETWEEN cast('2006-08-01 02:00' as Timestamp) and cast('2006-09-08 05:00' as Timestamp) order by t.dataora,p.id_punti_monitoraggio"
--otable-out "time#rain#CONSOLE"
}


and it would look like:


Note that on the console output the date is transformed to a long value of milliseconds.


There is also a g.fork command, that makes it possible to send the output to more than one output processor.
Let's see for example the script that forks the output to the normal table output on console, but also to a chart output processor:


String startDate = "2006-09-08 02:00";
String endDate = "2006-09-08 05:00";

jgrass {
g.fork --iscalar-in [
db.query
--query "select t.dataora, t.valore from punti_monitoraggio p, metadati m, serie_temporali t where p.id_punti_monitoraggio = 1101 and p.id_punti_monitoraggio=m.punti_monitoraggio_id and t.metadati_id=m.id and m.tipologia_serie_temporali_id=2 and t.intervallo = 30 and t.dataora BETWEEN cast('2006-08-01 02:00' as Timestamp) and cast('2006-09-08 05:00' as Timestamp) order by t.dataora,p.id_punti_monitoraggio"
--oscalar-out * ]
--ochart-out "TIMEHISTOGRAM#Raindata 2006-09-08 02:00 - 2006-09-08 05:00#date#mm#rain"
--otable-out "time#rain#CONSOLE"

}


And the output would then be:

Sunday, June 29, 2008

New wikis, new blogs, new contributions

Finally we got the JGrass wiki up and running:

http://www.jgrass.org
http://jgrass.wiki.software.bz.it/jgrass/JGrass_Wiki

also a new blog was born about udig and I think I will start to contribute more stuff there instead on this here:

http://udig-news.blogspot.com


Also the beegis wiki is now there:

http://www.beegis.org
http://beegis.wiki.dev.fsc.bz.it/beegis/Beegis_Wiki


This will all make the number of my contributions to this blog more rare and probably more specialized for very strange JGrass things.
Well, the important thing is to contribute. :)

Cheers

Sunday, June 22, 2008

Osgeo Code Sprint 2008 - Bolsena

Bolsena, the day after.


A good feeling, to much new stuff to investigate, things to try, code to review.

I remember the day after the last years code sprint in Merano, were I wasn't able to write more than 20 lines of code because of all the organisation issues.

This year it has been even too much code. Thanks to the support of Daniele Romagnoli from the Geosolutions team, we were able to create the GRASS raster datastore for geotools.
What this will mean? Almost everything. For example that soon (we will bring this in udig trunc) GRASS rasters will be reprojected on the fly, that geoserver can serve them to google earth, that we are starting to follow the OGC coverage standard, that... that... at some point we will have tilecache!!

Oh, and yes, we finally compiled the imageio-ext libraries with gdal & friends bindings for macosx.

Well, it has been a highly productive week. Funny, because looking at the pictures, you would not exactly think that.

"Mens sana in corpore ludico"

Sunday, June 15, 2008

How to setup the Udig / JGrass / BeeGIS development environment while drinking a beer

THERE IS A BUG IN THE PLUGIN THAT MAKES THINGS OF THE AUTOMATIC TARGET PLATFORM NOT WORKING. PLEASE WAIT UNTIL THIS IS SOLVED> I WILL UPDATE HERE.

____________

Well, I wanted to start this like: "Installing your GIS development environment has never been that easy!", but since every time I start like that every time I get burried by bugs and problems, this time I will try to keep my feet on the grund. :)

Alright, so I wrote my first plugin for the eclipse IDE. It is a plugin that automatically installs everything needed to do Udig-sdk, JGrass or BeeGIS development. Also it tries to import projects and configure the target platform, in order to really help beginning rcp developers to start with GIS development.

Here the step-by-step guide to do so (this assumes that you downloaded the eclipse IDE suitable for plugin development):

step 1) connect to the update site and install the plugin that will take care of all this

Go under Help->Software updates->Find and install


select the second: search for new features to install


in the next tab select new remote site and insert as name: JGrass Devel Setup
and as URL: http://www.hydrologisprojects.com/jgrass-devel-setup-update


after pushing the finish button, eclipse will contact the update site and present the plugin to install:


Select it, push next, accept the license agreement, push next once more and in the last tab push the finish button.

Eclipse will download the plugin, prompt for installing verification and after ok, it will also prompt you to restart eclipse.
Let's answer everything asked with ok, yes or whatever positive answer.

Once restarted we go in Window->Show View->Other...


and we will get the list of available views:


Select the JGrass DevelEnv Setup View and you will get a view window with some choices:


At that point you have several choices:
  • install the udig sdk
  • install the JGrass extras
  • install the svn code from the JGrass repository
  • install the svn code from the BeeGIS repository
I will leave them all checked for this example, which will lead to install everything.


step 2) Installation: Push the button and open the beer!

If everything went well, what should happen now is:

- download of the udig sdk (this will take a while, about 100MB to be transfered)


- extraction of the udig sdk into your workspace


- download of the JGrass sdk extras and its extraction into the udig sdk


- checkout of the JGrass svn code and import of the checked out projects into eclipse workspace


- checkout of the BeeGIS svn code and import of the checked out projects into eclipse workspace


Be sure it finished (in my case it took 14 minutes to download and checkout everything)


step 3) setting the target platform

You will probably notice that all the imported projects have compilation problems. This is ok, since they do not yet have the proper target platform set to compile against. That is what we will do in the next and last step.

Go under the eclipse preferences and there select: Plug-in Development->Target Platform


You will note in the lower part a section dedicated to Pre-defined Targets. The plugin adds a new pre-defined target, which points to the newly downloaded and prepared udig-sdk. Select the entry JGrass/Udig Target Platform and push the load target button. You will note that now some net.refractions.udig.* plugins are listed. If so, you did it right.
Make sure that all the plugins are selected, if they are not, select them all.

Before pushing apply you see the compilation problems:


After pushing apply the errors have gone:


You are now ready to start development!
Already finished the beer?

Enjoy and please let me know any issue. This is the first version of the plugin, so there could be issues for example on different platforms. Right now I tried it only on Macosx to make this howto.


PS: if you are curious about the versions of which software it is using and where downloading from, have a look at the configuration file it uses (it connects to that site): http://www.hydrologisprojects.com/testfiles/config.properties

Friday, June 13, 2008

How to use an openmi enabled Kriging in JGrass

The last period has been full of nice conferences, which is great, but the productivity lowers :)

However I am back with a nice piece of proof that the JGrass console is a nice thing.

I would like to show you how to use the Kriging module and explain a bit of what is behind the tecnique I used.

The Kriging module is written in fortran. I wrapped its methods from C functions and compiled alltogether into a dynamic library. The functions are:


int initializepoint(double *xbasin, double *ybasin, double *zbasin, int nbasin)
{
finitializepoint_(xbasin, ybasin, zbasin, &nbasin);
return 0;
}

int initializegrid(double *window)
{
finitializegrid_(window);
return 0;
}

int getValues(double *xstation,double *ystation, double *zstation,int* nstaz,
double *rain, double *interpolatedrain) {
int ret = fgetvalues_(xstation, ystation, zstation,
nstaz, rain,
interpolatedrain);
return ret;
}

int finish()
{
int ret = ffinish_();
return ret;
}


I then used the jna library (as previously explained here) to create the native calls from java, which results in a quick:


public interface KrigingLibrary extends Library {
KrigingLibrary INSTANCE = (KrigingLibrary) Native.loadLibrary("kriging", KrigingLibrary.class);

void initializepoint( double[] xbasin, double[] ybasin, double[] zbasin, int nbasin );

void initializegrid( double[] window );

void getValues( double[] xstation, double[] ystation, double[] zstation, int[] nstaz,
double[] rain, double[] interpolatedrain );

void finish();
}


That is all I did to access the native fortran code from java.

What is the result?

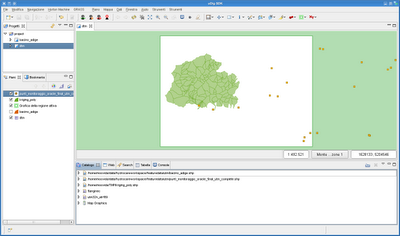
Assume that I have a region with some monitoring points and a layer of polygons. And assume that the monitoring points are rain measurement stations and are on a spatial database, geometry and timeseries. And assume also that I have a layer of polygons representing basins, inside the baricenter of which I need to calculare the rain, given through a Kriging interpolation.

Something like the below:


Alright, here is the JGrass script to do so:


String startDate = "2006-09-07 00:00";
String endDate = "2006-09-10 00:00";

jgrass {
h.kriging --iscalar-timeseries [ db.readts
--tssql "select p.id_punti_monitoraggio,t.dataora,t.valore from punti_monitoraggio p, metadati m, serie_temporali t where p.id_punti_monitoraggio similar to '(MPID)' and p.id_punti_monitoraggio=m.punti_monitoraggio_id and t.metadati_id=m.id and m.tipologia_serie_temporali_id=2 and t.intervallo = 30 and t.dataora BETWEEN cast('STARTDATE' as Timestamp) and cast('ENDDATE' as Timestamp) order by t.dataora,p.id_punti_monitoraggio"
--mpsql "select distinct p.id_punti_monitoraggio, x(shape), y(shape) from punti_monitoraggio p, metadati m where p.id_punti_monitoraggio=m.punti_monitoraggio_id and m.tipologia_serie_temporali_id=2 and x(shape) between WEST AND EAST AND y(shape) between SOUTH AND NORTH"
--start $startDate
--end $endDate
--dt 30
--bounds "5202000,5145000,1681300,1603100"
--memorymapped "false"
--oscalar-timeseries * ]
--dogrid "false"
--ishapefile-positions "/home/moovida/TMP/kriging_poly.shp"
--oscalar-outputmap dummy
}


Where --tssql defines the query to be done to the database (the connection to which is defined in the JGrass preferences) in order to get a ID,DATE,VALUE of the timeseries. STARTDATE AND ENDDATE are substituted from the parameters, as you may have guessed, as well as NORTH, SOUTH, EAST and WEST.

MPID are taken from the --mpsql query, which returns an ordered set of station infos: ID, X, Y

--dogrid "false" tells the kriging that we don't want the resulting interpolation as raster format. If "true", it would interpolate the values over a regular grid and write down a map for that.

In that case the module reads the polygon layer calulates its baricenters and then interpolates the rain properly.

I have the possibility to set also a startdate, enddate and a timestep for the model:


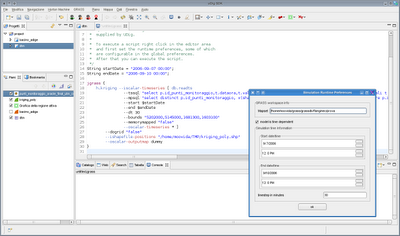
Which will trigger the reader to read those dates from the database and interpolate at the given timesteps.

In this case we had 126 basins. Just to quickly show the result, I attached an --oscalar-outputmap in order to just print the result to console:


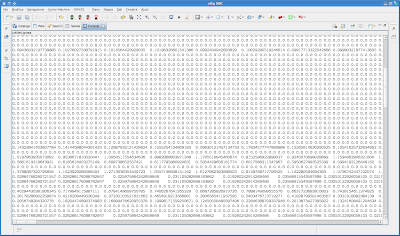
I have still a bug on the gridded Kriging part, so I can't show you the result with many maps that you would for sure like more, but I will update as soon as I solve that one.

Sunday, June 1, 2008

How to use groovy in a JGrass plugin

Those that tried Groovy will probably agree with me to the fact that for certain things groovy is makes things really really fast against standard java.

I was wondering if it is possible to mix groovy code inside a JGrass plugin and use it without problems as if it was java. Since groovy can be compiled into java bytecode, I thought it would work and be worth the try.

Here the results:

1) I first created a plugin called eu.hydrologis.jgrass.groovy inside which I put the following groovy libraries:
  • asm-2.2.jar
  • groovy-1.5.5.jar
2) installed the groovy plugin for eclipse from http://groovy.codehaus.org/Eclipse+Plugin

3) created my test plugin eu.hydrologis.jgrass.groovy_test

4) rightclick on the plugin project and under teh entry Groovy -> Add Groovy Nature

5) added the eu.hydrologis.jgrass.groovy to my dependencies

6) I didn't really want to test something spatial, just if the classloader would work properly.
So I simply created a udig operation.


public class GroovyOp implements IOp {

public void op(final Display display, Object target,
IProgressMonitor monitor) throws Exception {

final GroovyTest gT = new GroovyTest();

display.asyncExec(new Runnable() {

public void run() {
MessageBox msg = new MessageBox(display.getActiveShell(),
SWT.ICON_INFORMATION);
String s = "Sorted cars in XML:\n";
for (String str : gT.getSort()) {
s = s + str + "\n";
}
msg.setMessage(s);
msg.open();
}
});
}

}


Where the class GroovyTest is in fact a groovy class: GroovyTest.groovy


package eu.hydrologis.jgrass.groovy_test

import eu.hydrologis.jgrass.groovy_test.GroovyTest
class GroovyTest{
private String[] stuff = null;

public GroovyTest()
{
def cars = '''

Australia
Production Pickup Truck with speed of 271kph


Isle of Man
Smallest Street-Legal Car at 99cm wide and 59 kg in weight


France
Most Valuable Car at $15 million


'''

def records = new XmlSlurper().parseText(cars)

def sortedNames = records.car.list().sort{ it.@year.toInteger() }.'@name'*.text()
sortedNames.each{
println it
}

stuff = sortedNames as String[]
}

public String[] getSort() {
return stuff;
}

public static void main(String[] args){
new GroovyTest();
}
}
Since I am doing just an xml test and my code parser for coloring goes mad with xml, I attach a screenshot of the groovy code:


7) I then run the test operation on any layer (I called the operation groovy test, find it in the list), not so important, this is all dummy testing:


8) and see it there, the result is as expected, one line to parse an xml file... now that is nice!


--------------------

Update: from the groovy eclipse plugin site: http://groovy.codehaus.org/Eclipse+Plugin

Create a Groovy Project

To create a basic Groovy project in Eclipse perform the following steps:

  • Go to: File -> New -> Project
  • Select Java Project and press Next
  • In the Project Name field enter the name of your project (GroovyJava for this example)
  • Under Project Layout select Create separate source and output folders and press Finish
  • In the Package Explorer find the newly created project, right click, and select Groovy -> Add Groovy Nature

So far you should have a src folder, a bin-groovy folder, and several libraries. There is also a bin folder that was created by Eclipse, but is hidden due to exclusion filters. The next steps are needed to make the bin-groovy folder the default output folder, and to connect it to the src folder so that the debugger will know where to find the associated source and classes:

  • In the Package Explorer, right click on the "GroovyJava" project, and select: Build Path -> Configure Build Path
  • Select the Source tab and then use the Browse button to change the Default Output Folder from bin to bin-groovy
  • Press OK, OK

This will expose the bin folder in the Package Explorer. I'm not sure why the plugin creates a bin-groovy directory. Perhaps there are other "bin" files that are best kept separate from the Groovy classes, or perhaps one of the original versions of Eclipse didn't create a "bin" directory automatically. Some day when someone has a clear idea of the usefulness of this, or lack thereof, we can clean up my instructions.