Showing posts with label crs. Show all posts

Friday, September 25, 2020

SMASH 1.5.0 is out - raster enhancements, CRS, exports and measuring tool

Today we released SMASH 1.5.0 for Android and IOS to the markets.

Quite some work has been done in the raster and projection system backbone.

Raster data and CRS

When it comes to geopackage a lot is allowed. Until now SMASH (as geopaparazzi) allowed to view only tile data generated using the google tiling scheme. And moreover data was visible only at zoom levels for which the tiles had been prepared. This is a problem inherited in many workflows from the preparation of mbtiles datasets. Often in these cases zoomlevel beyond the original image's resolution are generated bloating the database to gigabyte size even for small regions.

Gdal is smart and by default generates only one zoomlevel at the optimal image resolution and using the best tile schema. And yes, also the projection might be different from the usual epsg 3857 used in the google tile scheme. 

Supporting this has been important, since it allows to create geopackages of big imagery maintaining more or less the same size. So now we have two ways to load geopackage tile datasets.

In the properties view of geopackage layers you will have more options now:

Apart of the opacity now there are two more options. The first enables the possibility to load a wider range of tiles schemas. Here an example of an ortophoto reprojected with gdal and packaged as geopackage:


This features has a larger memory footprint as it loads the tiles in memory as an image. So if the dataset is too large for your device you might need to go back to loading it with classic tiling scheme.

Since we are at it, what is the second option? It allows to select a color to make transparent. This is very useful when there is the need to overlay technical maps over an elevation model or ortophoto. But it also solves a situation like this:

These are two geopackage layers of a reprojected ortophoto. When both loaded the black collar of one covers the other.  It is possible to set the black collar to transparent:

Which results in:

which looks already better. Actually, when the jpeg geopackage tiles are generated, there is some interpolation and antialiasing going on, which makes part of the color not completely black, hence the remaining pixels. But if we load the original geotiffs and remove the collar from the upper image, the result is nice and clean (and also way faster to load);


This is how it looks like if we remove white from the image below:

So what about reprojecting data?

Yes, we added a nice CRS view in the settings:

from which we also can add new projections by epsg code:

The projection information is downloaded from the internet and the projection is registered:


Available projections are used to reproject vector datasets (geopackage layers and shapefiles) onto the map. This works very nicely.

If a dataset is loaded into the layerview and its projection is not known, SMASH will download and register it:


If the projection is not recognised, the user will be prompted to supply the epsg code for the projection:


While vector datasets are nicely reprojected, with raster it is a different story. At the moment only the raster boundingbox is reprojected to place the image in the right spot, but the result can be also quite bad. So while it looks nice in one corner:

it can be bad in the other:

So this is more a fallback workaround for the case you forgot to prepare a dataset, it is not really a solution yet.

So, handle with care!

GPS, to filter or not to filter

In previous SMASH releases we introduced the Kalman filtered GPS signal. It was available only for gps logs that were recorded. To make things more consistent, the behavior has been extended to all GPS dependent features. So the filtered GPS setting

now has some impact. As a reminder, in case of gps logs original and filtered GPS signal are BOTH always saved into the database and the user can choose to look at the original and/or filtered log. This still applies. 

But now the GPS position layer obeys to the setting. And when you insert a note in the gps position, the one defined in the settings will be used. 

This might sound scary but it actually is not. Just remember to have your settings right.

To aid the user, the "other" position is shown using a tin line and a dot starting from the current used position:


For example when driving through a tunnel, the original position on android can be jumpy:


New Toolbar

Since we are starting to prepare for geometry editing in geopackages, we started to think about a proper toolbar already. We came up with a small handler in the lower right corner:

which allows to activate the bottom toolbar:

The feature info tool has already been migrated from the right drawer down here.

And a new tool has been added in this release: the measurement tool. For those coming from geopaparazzi, I am sure they were missing it. With this tool you can drag over the map and have a qualitative measurement of the distance:


Other features

SMASH has two new export formats: GPX and KML. These export the whole survey project to a single GPX/KML file:

If instead you need to export one single log to gpx (since that is a great exchange format for SMASH users, being able to overlay it), you can do that sliding a log from the log view:


Last but not least, during logging now some time and distance (normal and filtered... note the difference when driving through several tunnels with a jumpy GPS) related information are shown:


That is all for version 1.5.0. Enjoy!!

Tuesday, October 21, 2008

The day GRASS maps learned to fly through my projections

On of the things I was dreaming from bringing the GRASS raster format to geotools, was the fact to be able to reproject them on the fly. Be able to reproject them without all this issues around r.proj that I used so many time. Just select a box with the coordinate reference system and voila', distorce my map around the world... and now it is there, growing to be in the JGrass development version... and you have to see this...


1) the adige basin in EPSG:32632, UTM zone 32N


2) EPSG:3003, Gauss boaga (no evident change, just coordinates change)


3) the almighty EPSG:4326... the World Geodetic System 1984...


Tonight I will sleep quite :)

And soon the export to reprojected geotiff will come...


As good Simone makes me notice, I should thank those guys that helped me with that odd thing that is coverage. Some knowledge came from both (in alphabetic order :)) from:

Monday, March 17, 2008

How to find and use Bursa Wolf parameters for accurate coordinate transformation

Many times I had and heard about the problem of missing Bursa Wolf parameters for more accurate re-projections of data. While GRASS deals with them properly, most of the other GIS and also postgis do not. In Italy we have one of these odd problems related to the fact that historically we used to use as the main projection the EPSG:3003, Monte Mario / Italy Zone 1 projection.
Lately, everyone is migrating for standardization to the EPSG:32632, WGS 84 / UTM zone 32N.

What is the problem in all this?
The fact that the epsg 3004 comes like the following:


PROJCS["Monte Mario / Italy zone 1",
GEOGCS["Monte Mario",
DATUM["Monte_Mario",
SPHEROID["International 1924", 6378388.0, 297.0, AUTHORITY["EPSG","7022"]],
AUTHORITY["EPSG","6265"]],
PRIMEM["Greenwich", 0.0, AUTHORITY["EPSG","8901"]],
UNIT["degree", 0.017453292519943295],
AXIS["Lon", EAST],
AXIS["Lat", NORTH],
AUTHORITY["EPSG","4265"]],
PROJECTION["Transverse_Mercator"],
PARAMETER["central_meridian", 9.0],
PARAMETER["latitude_of_origin", 0.0],
PARAMETER["scale_factor", 0.9996],
PARAMETER["false_easting", 1500000.0],
PARAMETER["false_northing", 0.0],
UNIT["m", 1.0],
AXIS["x", EAST],
AXIS["y", NORTH],
AUTHORITY["EPSG","3003"]]

which doesn't contain the Bursa Wolf parameters (to know more about it read here) without which there can be reprojection problems of many meters.

So we need a way to get those Bursa Wolf parameters.
Thank God there is a nice site called: http://www.epsg-registry.org

Jump in there and click on the upper tab called: retrieve by code.
You could also search in the query by filter tab, this will be explained later in the post.

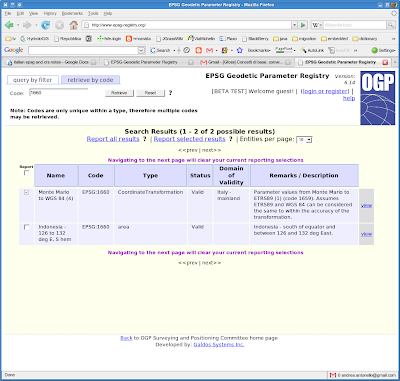
I will insert epsg 1660 and click on retrieve, which supplies me the following:


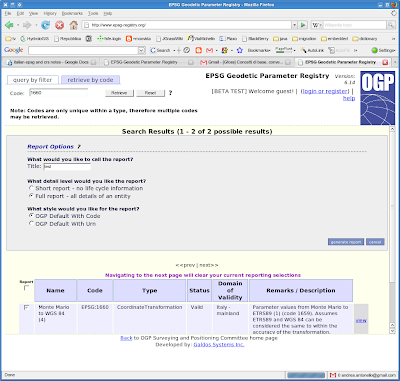
Select your area and click on Report selected results.


Please note that the domain of validity is described. Italy mainland, which is what I need.

Fill in what is asked and just press play :)


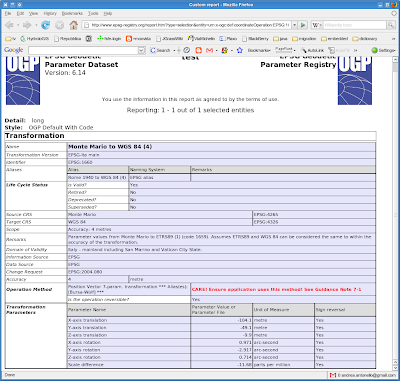
On the lower part you will find the needed Bursa Wolf parameters, often also referred to as the "towgs parameters" :)

What is needed to be done, is to add to the 3003 definition these parameters:

TOWGS84[-104.1, -49.1, -9.9, 0.971, -2.917, 0.714, -11.68],

which will result in having the following definition:


PROJCS["Monte Mario / Italy zone 1",
GEOGCS["Monte Mario",
DATUM["Monte Mario",
SPHEROID["International 1924", 6378388.0, 297.0, AUTHORITY["EPSG","7022"]],
TOWGS84[-104.1, -49.1, -9.9, 0.971, -2.917, 0.714, -11.68],
AUTHORITY["EPSG","6265"]],
PRIMEM["Greenwich", 0.0, AUTHORITY["EPSG","8901"]],
UNIT["degree", 0.017453292519943295],
AXIS["Geodetic longitude", EAST],
AXIS["Geodetic latitude", NORTH],
AUTHORITY["EPSG","4265"]],
PROJECTION["Transverse_Mercator"],
PARAMETER["central_meridian", 9.0],
PARAMETER["latitude_of_origin", 0.0],
PARAMETER["scale_factor", 0.9996],
PARAMETER["false_easting", 1500000.0],
PARAMETER["false_northing", 0.0],
UNIT["m", 1.0],
AXIS["Easting", EAST],
AXIS["Northing", NORTH],
AUTHORITY["EPSG","10003003"]]

Note that I also changed the 3003 to 10003003 to be sure tyo not have conflicts with other crs. I created that in postgis as addionional CRS in order to be able to do proper transformations.

Usually you will not have the proper epsg code to use, right?
Luckily Antonio (thanks man, got a link to share?) supplied us with a better method to find what you are looking for.
Assuming you are still on the epsg-registry site:
1. start by clicking on "query by filter" button;
2. click on "Type" textbox and choose Coordinate Transformation and then Single only;
3. write the name of the area of use (e.g. Italy) in the "Area" textbox and finally click on Search button.
You will get a whole list of possible transformations as a result, which will probably be too many, so if you want to limit them to your area of interest to get the most precisely defined transformation for your region, you have to follow step 1. and 2. the same as before before.
Then:
2. write the name of the transformation of use (e.g. "Monte Mario to WGS 84") in the "Name" textbox
3. click on "Type" textbox and choose Coordinate Transformation, Single only and finally click on Search button.


In JGrass / uDig this is way easier. Click on the button reporting the projection definition. A window will ask to choose the crs from a list. A second tab says: Custom CRS. Select that one and paste your crs definition (in my case the 10003003) into the box and press apply and ok.

Thanks to the GFOSS.it mailinglist for discussing this and to Antonio Falciano for reporting the epsg-registry site.

Thursday, January 31, 2008

How to create a temporary layer with proper CRS with new FeatureType

In the code examples of the udig sdk you can find a nice snippet explaining how to create a temporary resource layer. One of those nice things which a user can decide whether to keep and save to shapefile or just trash it.

Let's see the code:


List featuresList = this is my list subset of a leyer or whatever
String geomType = "MultiPolygon";
Object[][] ob = new Object[featuresList.size()][2];
for( int i = 0; i < featuresList.size(); i++ ) {

ob[i][0] = featuresList.get(i).getGeometry();
ob[i][1] = i;
}
FeatureType featureType = null;
String typeName = "Macrobacini";
try {
featureType = DataUtilities.createType(typeName, "geom:" + geomType
+ ",indice:java.lang.Integer");
featureType = DataUtilities.createSubType(featureType, null, ApplicationGIS.getActiveMap().getViewportModel().getCRS());
} catch (SchemaException e1) {
e1.printStackTrace();
}

JGrassCatalogUtilities.removeMemoryServiceByTypeName(typeName);

IGeoResource resource = CatalogPlugin.getDefault().getLocalCatalog()
.createTemporaryResource(featureType);
FeatureCollection coll = FeatureUtilities.createFeatures(featureType, ob);
try {
resource.resolve(FeatureStore.class, pm).addFeatures(coll);
} catch (IOException e) {
e.printStackTrace();
}
ApplicationGIS.addLayersToMap(ApplicationGIS.getActiveMap(), Collections
.singletonList(resource), -1);


I added the createsubtype part because beeing the featuretype created from scratch, the CRS was missing and it interpreted my coordinates as lat/long, and therefore out of the admitted degrees.

The removeMemoryService part is needed because no two memorydatastores of the same name are admitted in the same catalog service, and a nice:
java.lang.UnsupportedOperationException: Schema modification not supported
is thrown whenever you force it to try nevertheless.

Therefore the service has to be removed before going on, which is done like that:


public static synchronized void removeMemoryServiceByTypeName( String typeName ) {
MemoryServiceImpl service = null;
try {
List< ? extends IResolve> members = CatalogPlugin.getDefault().getLocalCatalog()
.members(new NullProgressMonitor());
for( IResolve resolve : members ) {
if (resolve instanceof MemoryServiceImpl) {
if (URLUtils.urlEquals(resolve.getIdentifier(), MemoryServiceExtensionImpl.URL,
true)) {
service = (MemoryServiceImpl) resolve;
break;
}
}
}
MemoryDataStore ds = service.resolve(MemoryDataStore.class, new NullProgressMonitor());
if (Arrays.asList(ds.getTypeNames()).contains(typeName)) {
CatalogPlugin.getDefault().getLocalCatalog().remove(service);
}
} catch (IOException e) {
CatalogPlugin.log("Error finding services", e); //$NON-NLS-1$
}
}


Wednesday, January 23, 2008

How to deal with projections (i.e. Coordinate Reference Systems in geotools)

Note that this is a brute copy and paste from the geotools wiki.


- get the CRS from an epsg code:

import org.geotools.referencing.CRS;
CoordinateReferenceSystem sourceCRS = CRS.decode("EPSG:4326");


- create a CRS from well known text (WKT):


String wkt = "GEOGCS[" + "\"WGS 84\"," + " DATUM[" + " \"WGS_1984\","
+ " SPHEROID[\"WGS 84\",6378137,298.257223563,AUTHORITY[\"EPSG\",\"7030\"]],"
+ " TOWGS84[0,0,0,0,0,0,0]," + " AUTHORITY[\"EPSG\",\"6326\"]],"
+ " PRIMEM[\"Greenwich\",0,AUTHORITY[\"EPSG\",\"8901\"]],"
+ " UNIT[\"DMSH\",0.0174532925199433,AUTHORITY[\"EPSG\",\"9108\"]],"
+ " AXIS[\"Lat\",NORTH]," + " AXIS[\"Long\",EAST],"
+ " AUTHORITY[\"EPSG\",\"4326\"]]";
CoordinateReferenceSystem crs = CRS.parseWKT(wkt);


- search for the official epsg code from a WKT:


String name = "ED50";
String wkt =
"GEOGCS[\"" + name + "\",\n" +
" DATUM[\"European Datum 1950\",\n" +
" SPHEROID[\"International 1924\", 6378388.0, 297.0]],\n" +
"PRIMEM[\"Greenwich\", 0.0],\n" +
"UNIT[\"degree\", 0.017453292519943295]]";
CoordianteReferenceSystem example = CRS.parseWKT(wkt);

String code = CRS.lookupIdentifier( example, true ); // should be "EPSG:4230"
CoordinateReferenceSystem crs = CRS.decode( code );


- reproject geometries:


CoordinateReferenceSystem sourceCRS = CRS.decode("EPSG:4326");
CoordinateReferenceSystem targetCRS = CRS.decode("EPSG:23032");
MathTransform transform = CRS.findMathTransform(sourceCRS, targetCRS);
// jts geometry
Geometry targetGeometry = JTS.transform( sourceGeometry, transform);
// iso geometry
Geometry target = geometry.transform( targetCRS );