We are finally starting to expand a bit the console scripting language.
What does that mean?
Well, that to get a martix of data from a map you now can write:
def matrix = fromMap("mapname")
and then access as an array the matrix.
The same works the way round:
toMap "mapName", matrix
Note that if the method returns a value, you need the brackets around the parameters.
What else?
You can now load a raster to be visible like that:
load "mapname"
And how many times did you want to isolate some maps from a mapset full of maps, to give just those to a collaborator?
Now you do it like that:
copyToNewMapset "test", "adigeall_dtm", "adigeall_pit", "adigeall_flow"
which will create a new mapset (in this case named test) inside the current location and copy there just the maps you want (which in this case are 3).
Delete maps?
deleteMaps "adigeall_dtm", "adigeall_pit"
And more will come when it is needed. If you have cool ideas please let me know here, in the jGrass list or even better open a bug request for new feature.
Sunday, December 28, 2008
A merry Xmas and a happy new year...
A bit late for the fist, a bit early for the second... anyway...
from the HydroloGIS-JGrass team
from the HydroloGIS-JGrass team

Wednesday, December 17, 2008
Monday, December 8, 2008
Enhancements in the annotation layer
The time has come to enhance the annotation tool of beegis.
We now have two tools, one to create and one to destroy:
 1) the annotation tool has been enhanced for tablet pen usage.
The width and transparency are no longer sliders, but predefined combos. Less freedom sometimes can lead to better productivity. :)


The properties panel gives the possibility to quickly remove the last inserted stroke, without the need to change the tool.
Anyway, sometimes one needs to remove a stroke inserted earlier, so the need for an annotation remove tool grew.
2) the annotation remove tool
Since we are sopposing to be on the field with a table and it is not easy to pick exactly the stroke we want to remove, the annotation remove tool is a line tool.
That means that you just drag to draw a line (the remove tool draws a red line) and all the intersacting annotations will be removed:

in this case the line is going to remove the M and the upper orange line.

Indeed! :)
Sunday, December 7, 2008
Ladies & gentlemen... the fieldbook
It's been a long while. Yes, not always easy to have something decent to say :)
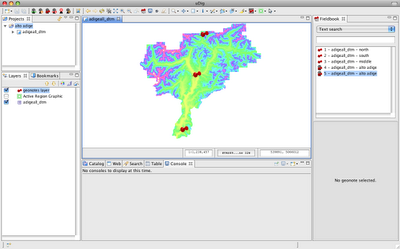
Finally a new one: the fieldbook.
When we designed and developed the geonotes for the Beegis extentions, the major problem was to be able to organise them properly, access them quickly and save them somehow. This is how the fieldbook came to life.
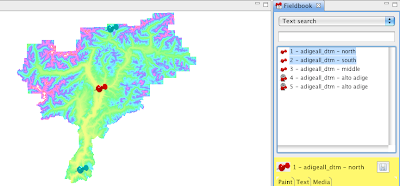
The field book wants to be an easy accessible collection of the geonotes we have created on our project.
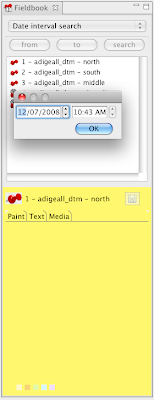
So how does the fieldbook look like?
Here you are:
And what can you do with it?
Well, assuming a case in which we have the following notes:
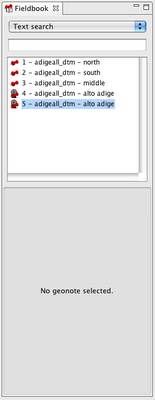
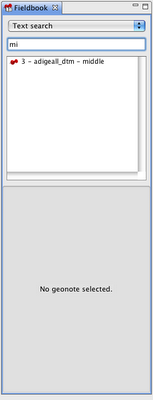
1) search by text in the title
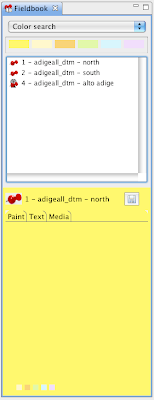
2) search by color
3) search by creation date
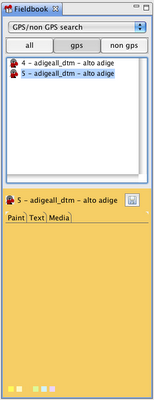
4) view gps taken notes
5) zoom to notes
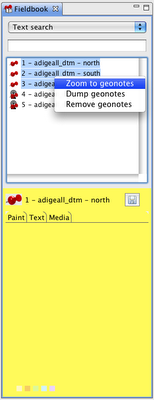
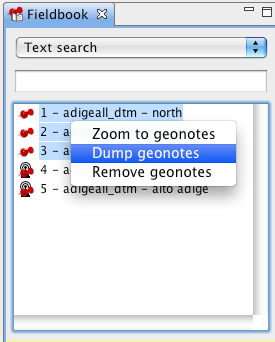
6) dump notes to disk, in which case a folder structure will be created with:
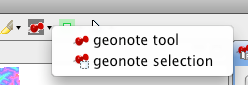
How does selection work?
1) selection from the map with the geonotes selection tool
 If you select by box from the map, in the filedbook only the selected notes are visible in the list.
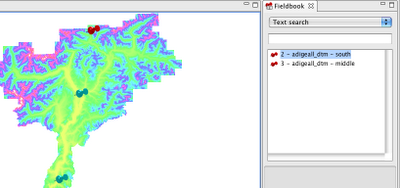
2) if instead you select from the fieldbook, the pins of the selected notes are highlighted (probably a yellow would be better for highlighted pins :)).
Well, that's all for now... just have to thank the ARPA Piemonte for founding this work and make it available for everyone, that is the way to behave!
Finally a new one: the fieldbook.
When we designed and developed the geonotes for the Beegis extentions, the major problem was to be able to organise them properly, access them quickly and save them somehow. This is how the fieldbook came to life.
The field book wants to be an easy accessible collection of the geonotes we have created on our project.
So how does the fieldbook look like?
Here you are:

And what can you do with it?
Well, assuming a case in which we have the following notes:

1) search by text in the title

2) search by color

3) search by creation date

4) view gps taken notes

5) zoom to notes

6) dump notes to disk, in which case a folder structure will be created with:
- an image of the paint tab
- a text file with the text tab content
- a folder with all the media present in the media tab

How does selection work?
1) selection from the map with the geonotes selection tool
 If you select by box from the map, in the filedbook only the selected notes are visible in the list.
2) if instead you select from the fieldbook, the pins of the selected notes are highlighted (probably a yellow would be better for highlighted pins :)).

Well, that's all for now... just have to thank the ARPA Piemonte for founding this work and make it available for everyone, that is the way to behave!
Tuesday, October 21, 2008
The day GRASS maps learned to fly through my projections
On of the things I was dreaming from bringing the GRASS raster format to geotools, was the fact to be able to reproject them on the fly. Be able to reproject them without all this issues around r.proj that I used so many time. Just select a box with the coordinate reference system and voila', distorce my map around the world... and now it is there, growing to be in the JGrass development version... and you have to see this...
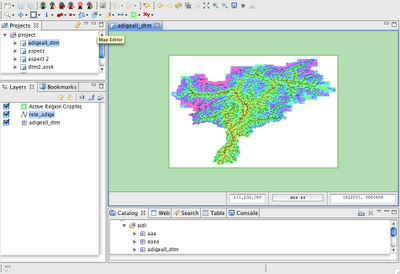
1) the adige basin in EPSG:32632, UTM zone 32N
2) EPSG:3003, Gauss boaga (no evident change, just coordinates change)
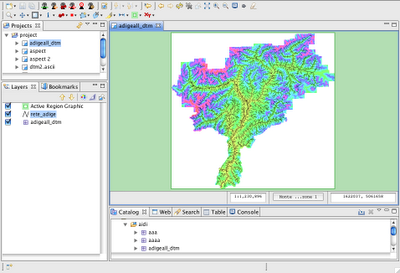
3) the almighty EPSG:4326... the World Geodetic System 1984...
Tonight I will sleep quite :)
And soon the export to reprojected geotiff will come...
As good Simone makes me notice, I should thank those guys that helped me with that odd thing that is coverage. Some knowledge came from both (in alphabetic order :)) from:
1) the adige basin in EPSG:32632, UTM zone 32N

2) EPSG:3003, Gauss boaga (no evident change, just coordinates change)

3) the almighty EPSG:4326... the World Geodetic System 1984...

Tonight I will sleep quite :)
And soon the export to reprojected geotiff will come...
As good Simone makes me notice, I should thank those guys that helped me with that odd thing that is coverage. Some knowledge came from both (in alphabetic order :)) from:
Monday, October 13, 2008
How to get GRASS related preferences into your code
What to do when you need the mapset that is currently set for doing calculations or even the path to the GRASS GISBASE?
Go and buy some at your preferred store:
Go and buy some at your preferred store:
           ScopedPreferenceStore preferences = (ScopedPreferenceStore) ConsoleEditorPlugin
                   .getDefault().getPreferenceStore();

           String mapsetString = preferences.getString(PreferencesInitializer.CONSOLE_ARGV_MAPSET);

           String gisbaseString = preferences
                   .getString(PreferencesInitializer.CONSOLE_ARGV_GISBASE);
Post African Post
I always thought I would write a really nice and long post about the FOSS4G2008 experience, as soon as I'm back. And now that I'm back? I am so tired, confused and overloaded with work that I wouldn't even know where to start :)
So for now, let me just point you to the presentation and workshop slides the JGrass Team held at FOSS4G2008 in Cape Town. They are what really matters, together with the JGrass release I'm going to cut in the next 48 hours fixing bugs we found at the various workshops.
JGrass presentations and workshop slides and data.
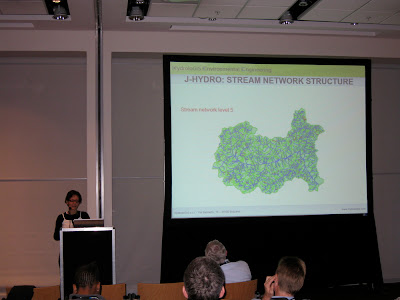
In order to have at least a few pictures of Cape Town in here:
1) Silvia presenting J-Hydro
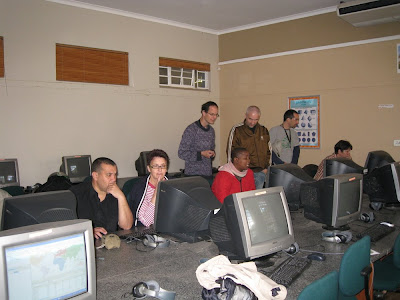
2) workshop for geography teachers at Trafalgar Highschool
3) showing where to go next year for having the same fun at FOSS4G2009

So for now, let me just point you to the presentation and workshop slides the JGrass Team held at FOSS4G2008 in Cape Town. They are what really matters, together with the JGrass release I'm going to cut in the next 48 hours fixing bugs we found at the various workshops.
JGrass presentations and workshop slides and data.
In order to have at least a few pictures of Cape Town in here:
1) Silvia presenting J-Hydro

2) workshop for geography teachers at Trafalgar Highschool

3) showing where to go next year for having the same fun at FOSS4G2009

Friday, September 26, 2008
Hydrology done by JGrass
Today I had to luck to assist in a hydrology lesson of professor Riccardo Rigon (this one done by Silvia) at the University of Trento. 60 young, wellbehaving, interested students sitting at the pcs I once upon a time was sitting (at that time using mapinfo)...
What an enormous feeling seeing them all use JGrass. Folks, here we are contributing to the formation of some of the future engineers... they are growing free!
Now I can really start relaxed to Cape Town.
This year we have 3 presentations, 1 workshop at the FOSS4G and a workshop for geography professors at a highschool in Cape Town.
After many years of struggles, these are all things that keep one's faith alive!
Cape Town, we are coming! :)

PS: if you are a hydrology/geomorphology teacher and want information about JGrass for education, feel free to contact us.
Wednesday, September 24, 2008
rcp cdrom permissions
You might wonder about the title, but that us exactly what I tried to google for when I tried to launch my rcp application (the GisPublisher, a minimal GIS to do data publishing from a readonly media like a DVD) from DVD.
Well, the application has a intro part inside which pdf documentation can be browsed, which is built on html pages that have to be dinamically created on application startup (see some screenshots under Pubblicazione DVD Pguap on this page).
To make a long story very short, the problem is that some files have to be parsed and modified, while the DVD id readonly.
Well, this has an easy solution, because the rcp system can copy a whole pile of files over to an ad-hoc created workspace on the users disk in his home folder.
To do so, you just have to create a config.ini file for the rcp product, which containes some lines like the following:
This in fact is not enough, and that can be the tricky part. To properly work, the plugins have to be exported packaged as individual jar archives (as the export dialog for plugins and fragments states) and not as folders.
Once those two easy things are done, the application will take a little while to startup the first time (depending on what it needs to copy over to the disk), but will work like a charm.
Well, the application has a intro part inside which pdf documentation can be browsed, which is built on html pages that have to be dinamically created on application startup (see some screenshots under Pubblicazione DVD Pguap on this page).
To make a long story very short, the problem is that some files have to be parsed and modified, while the DVD id readonly.
Well, this has an easy solution, because the rcp system can copy a whole pile of files over to an ad-hoc created workspace on the users disk in his home folder.
To do so, you just have to create a config.ini file for the rcp product, which containes some lines like the following:
osgi.instance.area=@user.home/yourapp
osgi.configuration.area=@user.home/yourapp
osgi.sharedconfiguration.area=@user.home/yourapp
This in fact is not enough, and that can be the tricky part. To properly work, the plugins have to be exported packaged as individual jar archives (as the export dialog for plugins and fragments states) and not as folders.
Once those two easy things are done, the application will take a little while to startup the first time (depending on what it needs to copy over to the disk), but will work like a charm.
Wednesday, September 17, 2008
Notes on guidelines for writing readable code documentation
Last weekend the team of HydroloGIS went to visit the Geomatys team in Montpellier (mostly Martin and Adrian, which have the same attitude to work on weekends that we have :) ) . Apart of having a great time with those nice guys in discussing most of the scientific issues that rule the universe, we had a very long and good discussion about geoapi/geotools coverages (but that will be the content of another post at some point).
After having been amazed by the gorgeous level and readability of their code documentation (if you can find a non well documented class in this project, Martin would probably buy you a beer for having read it all :) ), I asked them to have a chat about code documentation. Well, what follows here are some notes about that chat.
Note that this will be related to javadoc documentation.
General rules:
- Explain in you documentation why the class/method is used and how.
- the first sentence of each javadoc is a short summary of what the class/methos/variable does. That sentence is put in every field reporting summary. It should therefore never start with a paragraph tag.
- put always a first sentence, else you will end up with empty overviews in the documentation
- For methods: always start with a verb. For fields: always start with a noun. For classes/interfaces: verb or noun, on a case-by-case basis. Of course exceptions can occurr...
- end sentences with the dot.
- document everything, especially public items
- embed multiline code snippets in a pre tag. It will use a monospace font and write the contained parts in verbatim. Much better would be to create a taglet which could deal with formatting and coloring of the syntax.
- if there are different constructors of the class, explain how and why you would use them.
- lines should be at most 80 characters long.
Class annotations (minimum set to be used):
- @author obviously defines the author. It will be converted to a comma separated list of authors in the case of more than one, so avoid to put commas in the author annotation. If you want to add the affiliation o fthe author, put it between brackets.
- @since, @version a class may be there since version 1.0 and I may do some significant changes in version 2.0, in which case I upgrade the @version value to "2.0" but it doesn't allow me to remove this class. On the other hand, if I just introduced this class in version 2.0 (which would be indicated by @since 2.0) and I have not yet released this version of the software, then I still allowed to change my mind and remove this class/method.
- @see here other classes, interfaces or methods can be referenced, that are somehow related to the current one
- @deprecated defines that the class could disappear in future releases (usually the following one). Explain in this tag what the replacement is and if there is none, explain why.
Innline annotations:
- @link defines a hyperlink inside the documentation to the related class. As a rule of tumb always link to a certain class only the first time it appears in the documentation block, in order to avoid to make the docu unreadable.
- the basic syntax is {@link package.and.class.name}
- it is possible to add a text for the link: {@link package.and.class.name text}, in order to make it more readable, instead of having just the name of the class.
- link annotations are written in some monospace font and also permit the insertion of symbols like > and <.
- in the case one would not want to have a monospace font, but instead the current font of the documentation, the @linkplain annotation can be exploited
- links to methods are build the html anchor way with an #: {@link package.and.class.name#method}
- @value this link can be used for example in the case of constant variables: {@value package.and.class.name#const} will supply that value in the javadoc
- @code can be used for inline snipptes. They will be written in monospace font.
Package documentation:
- to document a package, in recent versions of java, add a PackageInfo.java file containing the javadoc to the package.
I wrote this mostly because I need to get more consistent in my code documentation, but I will also try to create a small guide to put on the JGrass wiki out of this and future reviews, in order to pass it to beginning developers that join our team. Learning things properly from the start is much better than forcing ourself to get them later, when there seems to never be the time.
Thursday, September 4, 2008
Understanding --oscalar-out, --otable-out, --ochart-out
This is just a review of what can be done with models that return a resultset made of scalar values.
For this example I will use h.cb, which is a JGrass command which is used to calculate statistics between maps. The explanation of the comand is beyond this post. H.cb is used because it has 2 scalar outputs and with one go I can explain more usages.
1) --oscalar-xxx
Oscalar can take the output and write it to console or to disk, formatted following the columns passed by the model.
The following usage:
will write one output to console and one to disk:
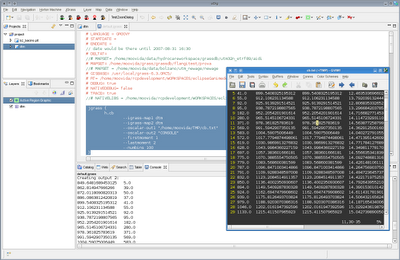
2) --otable-out
This does the same as oscalar, but adding the columns header that we supply in the command. Also it is possible to write to a widget.
The following syntax:
writes one output to a widget and one to the console:
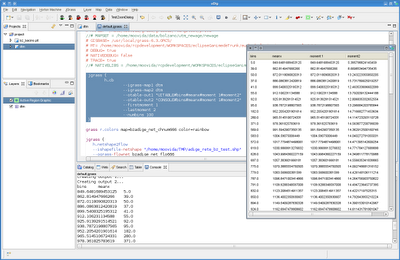
By putting a file path instead of CONSOLE, the result goes to that file.
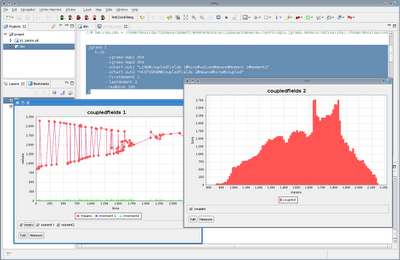
3) --ochart-out
This is a more complex one, since it creates a complete chart with the supplied data.
The syntax is made of:
- chart type
- chart title
- x axis label
- y axis label
- name of series 1
- name of series 2.... etc
The follwoing command:
will lead you to:
For this example I will use h.cb, which is a JGrass command which is used to calculate statistics between maps. The explanation of the comand is beyond this post. H.cb is used because it has 2 scalar outputs and with one go I can explain more usages.
1) --oscalar-xxx
Oscalar can take the output and write it to console or to disk, formatted following the columns passed by the model.
The following usage:
jgrass {
h.cb
       --igrass-map1 dtm
       --igrass-map2 dtm
       --oscalar-out1 "/home/moovida/TMP/cb.txt"
       --oscalar-out2 "CONSOLE"
       --firstmoment 1
       --lastmoment 2
       --numbins 100
}
will write one output to console and one to disk:

2) --otable-out
This does the same as oscalar, but adding the columns header that we supply in the command. Also it is possible to write to a widget.
The following syntax:
jgrass {
 h.cb
         --igrass-map1 dtm
         --igrass-map2 dtm
         --otable-out1 "UITABLE#bins#meanx#moment 1#moment2"
         --otable-out2 "CONSOLE#bins#meanx"
         --firstmoment 1
         --lastmoment 2
         --numbins 100
}
writes one output to a widget and one to the console:

By putting a file path instead of CONSOLE, the result goes to that file.
3) --ochart-out
This is a more complex one, since it creates a complete chart with the supplied data.
The syntax is made of:
- chart type
- chart title
- x axis label
- y axis label
- name of series 1
- name of series 2.... etc
The follwoing command:
jgrass {
h.cb
   --igrass-map1 dtm
   --igrass-map2 dtm
   --ochart-out1 "LINE#coupledfields 1#bins#values#meanx#moment 1#moment2"
   --ochart-out2 "HISTOGRAM#coupledfields 2#meanx#bins#coupled"
   --firstmoment 1
   --lastmoment 2
   --numbins 100
}
will lead you to:

Sunday, August 31, 2008
How to do calculations on maps: asking GRASS for help - part II
Perhaps one of the most used tools in GRASS for those that work with rasters, is the r.mapcalc. This tool gives you a powerful way to do algebra on raster maps.
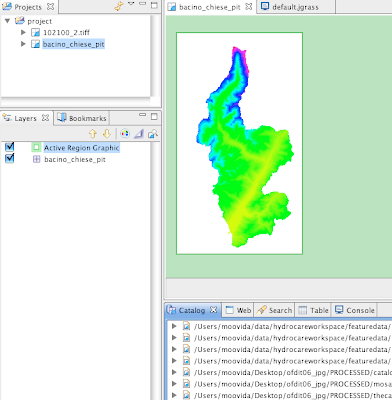
Let's have a look at it wearing the JGrass gui.
First search the tool in the raster tools:
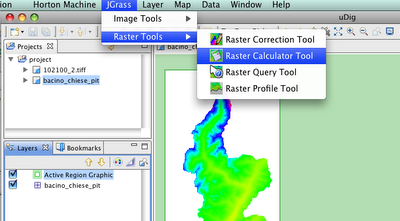
Selecting the tool you will get the calculator window:
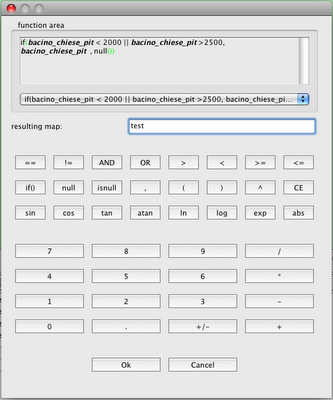
As you can see, there is an area into which to put the equation you want to do on the maps. The equation supports a minimal syntax highlighting. Important is the fact that existing maps are written in bold and italics, so if they are not, probably you are making a typo error and you can check the name of the map before executing it.
Also there is a resulting map text field, which represents the name of the created map.
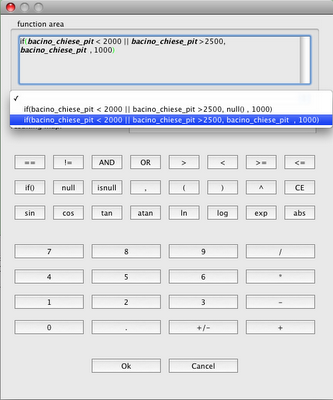
Another nice thing is the combobox that keeps track of the launched commands, also throught the JGrass session. The last 20 entries are saved over time:
In the first dialog the equation is the following:
if(bacino_chiese_pit <>2500, bacino_chiese_pit , null())
which translated means:
In the pixels of the map, in which the value is <> 2500 put the original value of the map, else put a novalue.
This is a very simple example, this tools can be really exploited with nested commands and strange stuff.
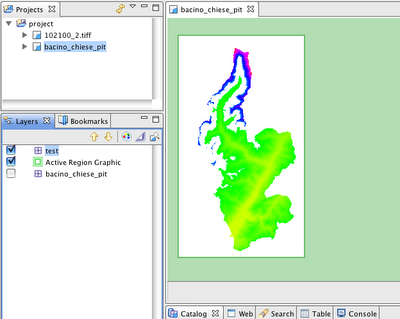
And the result is as expected:
Enjoy!
Let's have a look at it wearing the JGrass gui.
First search the tool in the raster tools:

Selecting the tool you will get the calculator window:

As you can see, there is an area into which to put the equation you want to do on the maps. The equation supports a minimal syntax highlighting. Important is the fact that existing maps are written in bold and italics, so if they are not, probably you are making a typo error and you can check the name of the map before executing it.
Also there is a resulting map text field, which represents the name of the created map.
Another nice thing is the combobox that keeps track of the launched commands, also throught the JGrass session. The last 20 entries are saved over time:

In the first dialog the equation is the following:
if(bacino_chiese_pit <>2500, bacino_chiese_pit , null())
which translated means:
In the pixels of the map, in which the value is <> 2500 put the original value of the map, else put a novalue.
This is a very simple example, this tools can be really exploited with nested commands and strange stuff.
And the result is as expected:

Enjoy!
How to create a contour map: asking GRASS for help - part I
As you probably know, JGrass can execute GRASS command, which makes it a really powerfull funbox.
So what if I want to extract a shapefile of contour lines from a DTM?
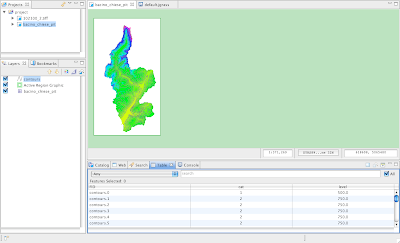
And we go from:
through:
to the needed layer:
So what if I want to extract a shapefile of contour lines from a DTM?
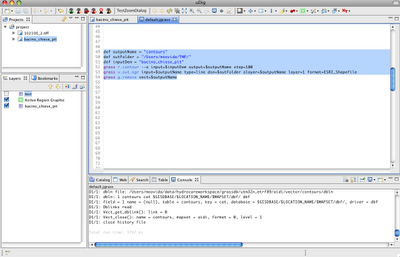
def outputName = "contours"
def outFolder = "/Users/moovida/TMP/"
def inputDem = "bacino_chiese_pit"
grass r.contour --o input=$inputDem output=$outputName step=250
grass v.out.ogr input=$outputName type=line dsn=$outFolder olayer=$outputName layer=1 format=ESRI_Shapefile
grass g.remove vect=$outputName
And we go from:

through:

to the needed layer:

Geosolutions coverage tools in Udig / JGrass
It is some time now that the Geo-solutions guys created at geotools level tools for tiling, mosaicing and creating overviews of images.
It was really time to have them in udig to use them on those images that trouble us with memory overload.
I have thought a thousand of times about creating a wizard at Udig level, so it could be in the standard Udig, but in the end I brought it as OpenMI based module into JGrass for several small reasons, but one main reason. As JGrass module it is scriptable and it also gets almost automagically a gui. Also the scripts can be launched with the console in standalone mode on serverside. So after a small discussion with Simone of Geosolutions we decided for them to be a JGrass module.
That means that to use those for now you will have to load the JGrass plugins.
So, what are those coverage tools?
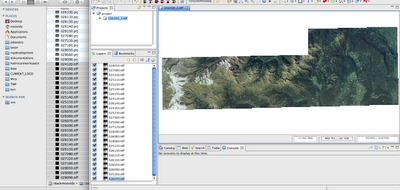
Imagine a schenario of the following kind: you have 25 geotiffs, that take one hour to load the first 3 of them and than freezes udig and at some point breakes completely.
This is probably due to the fact that those geotiffs do not have overviews.
Now you can solve it from Udig with the following:
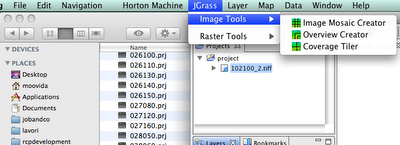
Choose the Overview creator and you will get a dialog:
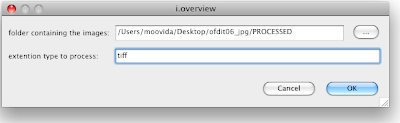 enter the folder and the extention of your images and press ok. The overview tool takes a hell of a time and for that hell of a time on my pc it takes all resources. And I mean ALL. Launch it best before going to sleep.
After the creation of overviews, your geotiffs should load really fast and without sucking your pc memory. Now I get really quickly my images loaded:
Well, what we do not like, is that we have 25 layers with one image each.
That is why in the coveragetools there is also an Image Mosaic Creator. Launch it:
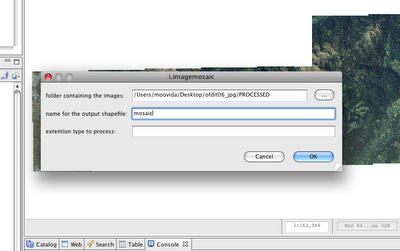
Since the extension defaults to tiff, I can omit it.
After a few seconds the shapefile is created and if I load it, the result is the following:

Two main differences:
1) the layer is just the one of the shapefile that loads all the geotiffs (great!!)
2) the background of missing tiles is black (ugly)
There is also a third tool, the Image tiler, which splits an image into smaller pieces of the dimension the user supplies.
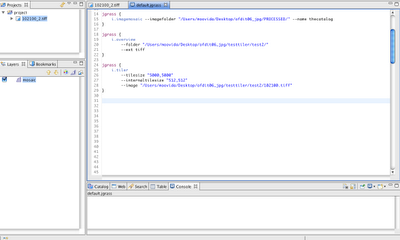
Alright, as promised for a bit more advanced users the same commands can be accessed from the console. In that mode it will be also possible to tweak some flags and values, which in the gui are set to default.
The scripts look like that:
This is really a nice set of tools for all those that do not have much memory.
The downside of the tools is that they work with the new geotools and therefore only with the new development version. But hey, in Cape Town we will try to use that one, so you will be able to get your Udig with all the tools in it by next month.
It was really time to have them in udig to use them on those images that trouble us with memory overload.
I have thought a thousand of times about creating a wizard at Udig level, so it could be in the standard Udig, but in the end I brought it as OpenMI based module into JGrass for several small reasons, but one main reason. As JGrass module it is scriptable and it also gets almost automagically a gui. Also the scripts can be launched with the console in standalone mode on serverside. So after a small discussion with Simone of Geosolutions we decided for them to be a JGrass module.
That means that to use those for now you will have to load the JGrass plugins.
So, what are those coverage tools?
Imagine a schenario of the following kind: you have 25 geotiffs, that take one hour to load the first 3 of them and than freezes udig and at some point breakes completely.
This is probably due to the fact that those geotiffs do not have overviews.
Now you can solve it from Udig with the following:

Choose the Overview creator and you will get a dialog:
 enter the folder and the extention of your images and press ok. The overview tool takes a hell of a time and for that hell of a time on my pc it takes all resources. And I mean ALL. Launch it best before going to sleep.
After the creation of overviews, your geotiffs should load really fast and without sucking your pc memory. Now I get really quickly my images loaded:

Well, what we do not like, is that we have 25 layers with one image each.
That is why in the coveragetools there is also an Image Mosaic Creator. Launch it:

Since the extension defaults to tiff, I can omit it.
After a few seconds the shapefile is created and if I load it, the result is the following:

Two main differences:
1) the layer is just the one of the shapefile that loads all the geotiffs (great!!)
2) the background of missing tiles is black (ugly)
There is also a third tool, the Image tiler, which splits an image into smaller pieces of the dimension the user supplies.
Alright, as promised for a bit more advanced users the same commands can be accessed from the console. In that mode it will be also possible to tweak some flags and values, which in the gui are set to default.
The scripts look like that:

This is really a nice set of tools for all those that do not have much memory.
The downside of the tools is that they work with the new geotools and therefore only with the new development version. But hey, in Cape Town we will try to use that one, so you will be able to get your Udig with all the tools in it by next month.
Friday, August 29, 2008
New JGrass tools to query and correct raster maps
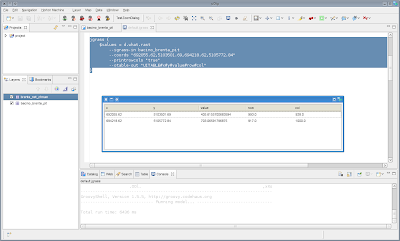
d.what.rast
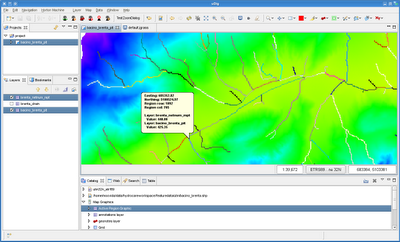
With JGrass under the info tools in the gui you can find the "Query tool" or in GRASS language d.what.rast.
By selecting one or more maps you are able to query a particular coordinate to get the raster value for that, together with some useful position info.
Now the same can be achieved from the console with more than one coordinate in order to get a list of coordinates and values to be used in the script:
will gain:
r.correct
In the same info icon menu you can find the Correct tool, or better known as r.correct.
Even if some of you might find it useless, some of us will need it for everyday's work. It gives the possibility to correct manually pixel values of a raster map.
For example here I have a map with a river (which pixels contain the channelnumber) network over an elevation model map. Note that the river map has novalues were there is no river.
If I click with the r.correct tool on a point on the river network, a dialog with a table containing the raster values opens and I am able to change those values and save the map (overwriting the old or creating a new one).
Note also that you have buttons all around the table that let you navigate the raster, if there are other values around you want to change.
The same of above by image:
1) click the point on the network in the area you want to change:
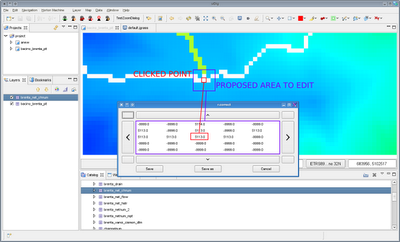
2) change the value of the pixel you want to change. In this case let's just split the network arm from the main network. Split means set a value to novalue, which by default is -9999.0:

3) save and hit refresh to redraw the map. The river is split:

With JGrass under the info tools in the gui you can find the "Query tool" or in GRASS language d.what.rast.
By selecting one or more maps you are able to query a particular coordinate to get the raster value for that, together with some useful position info.

Now the same can be achieved from the console with more than one coordinate in order to get a list of coordinates and values to be used in the script:
jgrass {
$values = d.what.rast
--igrass-in bacino_brenta_pit
--coords "692055.62,5103501.69,694218.62,5105772.84"
 --printrowcols "true"
--otable-out "UITABLE#x#y#value#row#col"
}
will gain:

r.correct
In the same info icon menu you can find the Correct tool, or better known as r.correct.
Even if some of you might find it useless, some of us will need it for everyday's work. It gives the possibility to correct manually pixel values of a raster map.
For example here I have a map with a river (which pixels contain the channelnumber) network over an elevation model map. Note that the river map has novalues were there is no river.
If I click with the r.correct tool on a point on the river network, a dialog with a table containing the raster values opens and I am able to change those values and save the map (overwriting the old or creating a new one).
Note also that you have buttons all around the table that let you navigate the raster, if there are other values around you want to change.
The same of above by image:
1) click the point on the network in the area you want to change:

2) change the value of the pixel you want to change. In this case let's just split the network arm from the main network. Split means set a value to novalue, which by default is -9999.0:

3) save and hit refresh to redraw the map. The river is split:

Thursday, August 28, 2008
The rasterizing tools are back in town
The v.to.rast tool is back:
Executing that converts from:
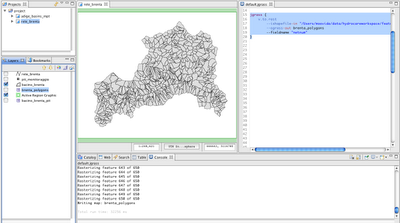
to that:
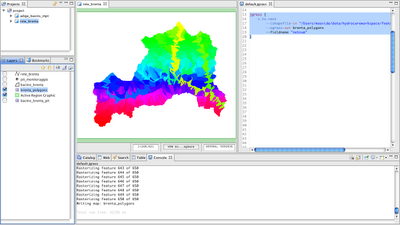
In this case conversion is based on the value in a field of the shape and on polygons. Obviously it works for all the geometry types.
jgrass {
v.to.rast
--ishapefile-in "/Users/moovida/data/hydrocareworkspace/featuredata/utm/bacino_brenta.shp"
 --ograss-out brenta_polygons
 --fieldname "netnum"
}
Executing that converts from:

to that:

In this case conversion is based on the value in a field of the shape and on polygons. Obviously it works for all the geometry types.
Wednesday, August 27, 2008
How to read a grass raster and script on it
I just added a r.read command to the console commands list. Currently it can read grass raster.
The console scripting code:
Please note that groovy really doesn't need type declaration.
Well on the raster data you could do some nice calculus:
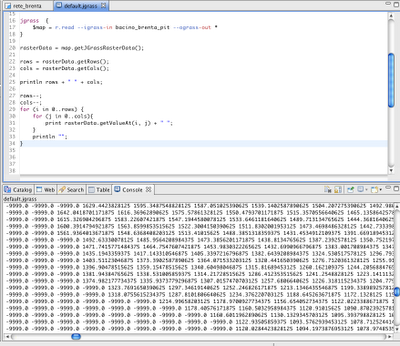
The console scripting code:
jgrass {
$map = r.read --igrass-in bacino_brenta_pit --ograss-out *
}

rasterData = map.getJGrassRasterData();

rows = rasterData.getRows();
cols = rasterData.getCols();

println rows + " " + cols;

rows--;
cols--;
for (i in 0..rows) {
for (j in 0..cols){
 print rasterData.getValueAt(i, j) + " ";
}
println "";
}
Please note that groovy really doesn't need type declaration.
Well on the raster data you could do some nice calculus:

How to add a new piece to the console
For several good resaons I wanted to teach the JGrass Console to speak groovy.
Well, since groovy supports java syntax, I thought this would go on the fly, but I was very, very wrong.
Nevertheless the speed of Groovy in handling files and many other things forced me to get my fingers dirty in the console compiler system, an IT magic created in coorperation with Andreas Hamm last year.
So the problems found were basically 3:
1) java blocks without labels are not supported in groovy, because of their ambiguity with closures
2) the direct assignment array construct is not supported: String[] str = {"a", "b"};
3) the Classloader works differently from the one of beanshell, and we don't see the needed classes
So Hamm and I spent an evening together in chat to make me understand how the internals of the console work.
And here I want to share that with you, by showing you how I solved problem 2, which contains also 1.It is not for the weak of heart (also because the code snippets are not well formatted), but believe me, after a starting desperation, I had quite some fun :)
0) identification of the problem
Groovy doesn't support an array creation like:
String[] __arg_v = {"a", "b" };
we need to change it to:
Argument[] __arg_v = new Argument[2];
__arg_v[0] = "a";
__arg_v[1] = "b";
and this should be general also to other types of arrays.
The problem in this case that no Abstract Syntax Tree operator was available to deal with array and therefor a new piece of syntac had to be created.
Step by step this was done like that:
1) add a new enumeration type to eu.hydrologis.jgrass.console.core.runtime.analysis.ASTs.java
In this case I added:
/**
*
* The identifier of an operator of the
* array e.g., "array[2]; array[0] = string1; array[1] = string2;
*
*
* @see eu.hydrologis.jgrass.console.core.runtime.nodes.AST_while
*/
AST_ARRAY(null, "ARRAY"); //$NON-NLS-1$
2) add a new class in eu.hydrologis.jgrass.console.core.runtime.nodes
ex. AST_array with a Default constructor and a Copyconstruktor
public final class AST_array extends AbstractAST implements AST {
// Construction
/**
*
* Constructs this object.
*
*/
public AST_array() {
super(ASTs.AST_ARRAY.expression(), ASTs.AST_ARRAY.annotation(), ASTs.AST_ARRAY);
} // AST_array
/**
*
* Constructs this object with the specified operands.
*
*
* @param operands - can be
*/
public AST_array( AST... operands ) {
super(ASTs.AST_ARRAY.expression(), ASTs.AST_ARRAY.annotation(), ASTs.AST_ARRAY, operands);
} // AST_array
} // AST_array
3) add the grammar to the NativeML4j
Add the Argument array type:
final SYM_type_array __typedef_argument = new SYM_type_array("Argument"); //$NON-NLS-1$
Search for the part in which the proper child is added in the method __native_model.
Before:
Argument[] args = {arg1, arg2}
Created by:
new AST_expression(
new AST_variable_definition(
new AST_type(__typedef_argv.type()),
new AST_identifier(__variable_argv),
new AST_assign_statement(
new AST_block(
__parameter_definition(
symtable,
operator))))),
Now we need an array, which changes things to the following:
new AST_variable_definition(
new AST_type(__typedef_argv.type()),
new AST_identifier(__variable_argv),
new AST_assign_statement(
new AST_array(
__parameter_definition(
symtable,
operator),
new AST_type(
__typedef_argument.type()),
new AST_identifier(__variable_argv))))
note how to the AST_array we pass the normal operators throught __parameter_definition, but also an AST_type, which will tell us at generation time which class to use for the array creation and also the name of the variable needed. The last said is needed to create the different array elements:
varname[0] = ...
varname[1] = ...
...
4) add the grammar to the JavaML4j
Exactly the same way done for grass models, we proceed for java models.
In __java_model I change the expression that was creating arrays the wrong way for groovy:
new AST_block(
__argument_definition(
( APT_argument_definition
)operator.argument_defs()
)
)
and change it with:
new AST_array(
__argument_definition((APT_argument_definition) operator
.argument_defs()),
new AST_type(__typedef_argv.type()),
new AST_identifier(__variable_argv))
The same is needed in __model_input and __model_output.
5) In eu.hydrologis.jgrass.console.core.runtime.compiler.AbstractML4j.java add the case.
In the method generate, crate a case based on the enum of 1) and create the proper generation of code there:
case AST_ARRAY:
/*
* this should be a set of strings (also concatenated) divided by commas
*/
targetCode.append("new "); //$NON-NLS-1$
AST typeChild = null;
AST commaChild = null;
AST variableChild = null;
for( int i = 0; i <> child = op.getChild(i);
if (child.identifier().annotation().equals(ASTs.AST_TYPE.annotation())) {
typeChild = child;
}
if (child.identifier().annotation().equals(ASTs.AST_COMMA.annotation())) {
commaChild = child;
}
if (child.identifier().annotation().equals(ASTs.AST_IDENTIFIER.annotation())) {
variableChild = child;
}
}
if (typeChild != null && commaChild != null && variableChild != null) {
int nums = commaChild.size();
String arrayString = typeChild.expression();
arrayString = arrayString.substring(0, arrayString.length() - 1) + nums + "]";
targetCode.append(arrayString).append(";\n"); //$NON-NLS-1$
// now the arrays
String varName = variableChild.expression();
for( int i = 0; i < j =" 0;"> child = commaChild.getChild(i);
generate(indentCount + 1, child, targetCode);
targetCode.append(";\n"); //$NON-NLS-1$
}
}
break;
The result?
Now the JGrass Console can use Beanshell and Groovy by defining the language as a session setting (in the settings lines that start with # in the script).
But hei, images tell more than thousand words:
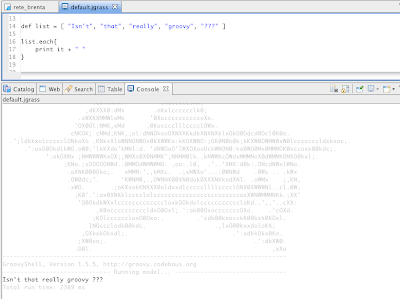
Go, closure, go!!!
Well, since groovy supports java syntax, I thought this would go on the fly, but I was very, very wrong.
Nevertheless the speed of Groovy in handling files and many other things forced me to get my fingers dirty in the console compiler system, an IT magic created in coorperation with Andreas Hamm last year.
So the problems found were basically 3:
1) java blocks without labels are not supported in groovy, because of their ambiguity with closures
2) the direct assignment array construct is not supported: String[] str = {"a", "b"};
3) the Classloader works differently from the one of beanshell, and we don't see the needed classes
So Hamm and I spent an evening together in chat to make me understand how the internals of the console work.
And here I want to share that with you, by showing you how I solved problem 2, which contains also 1.It is not for the weak of heart (also because the code snippets are not well formatted), but believe me, after a starting desperation, I had quite some fun :)
0) identification of the problem
Groovy doesn't support an array creation like:
String[] __arg_v = {"a", "b" };
we need to change it to:
Argument[] __arg_v = new Argument[2];
__arg_v[0] = "a";
__arg_v[1] = "b";
and this should be general also to other types of arrays.
The problem in this case that no Abstract Syntax Tree operator was available to deal with array and therefor a new piece of syntac had to be created.
Step by step this was done like that:
1) add a new enumeration type to eu.hydrologis.jgrass.console.core.runtime.analysis.ASTs.java
In this case I added:
/**
*
* The identifier of an operator of the
array keyword for the creation of an* array e.g., "array[2]; array[0] = string1; array[1] = string2;
*
*
* @see eu.hydrologis.jgrass.console.core.runtime.nodes.AST_while
*/
AST_ARRAY(null, "ARRAY"); //$NON-NLS-1$
2) add a new class in eu.hydrologis.jgrass.console.core.runtime.nodes
ex. AST_array with a Default constructor and a Copyconstruktor
public final class AST_array extends AbstractAST
// Construction
/**
*
*
*/
public AST_array() {
super(ASTs.AST_ARRAY.expression(), ASTs.AST_ARRAY.annotation(), ASTs.AST_ARRAY);
} // AST_array
/**
*
* Constructs this object with the specified operands.
*
*
* @param operands - can be
null or either a single operand or a list of operands.*/
public AST_array( AST
super(ASTs.AST_ARRAY.expression(), ASTs.AST_ARRAY.annotation(), ASTs.AST_ARRAY, operands);
} // AST_array
} // AST_array
3) add the grammar to the NativeML4j
Add the Argument array type:
final SYM_type_array __typedef_argument = new SYM_type_array("Argument"); //$NON-NLS-1$
Search for the part in which the proper child is added in the method __native_model.
Before:
Argument[] args = {arg1, arg2}
Created by:
new AST_expression(
new AST_variable_definition(
new AST_type(__typedef_argv.type()),
new AST_identifier(__variable_argv),
new AST_assign_statement(
new AST_block(
__parameter_definition(
symtable,
operator))))),
Now we need an array, which changes things to the following:
new AST_variable_definition(
new AST_type(__typedef_argv.type()),
new AST_identifier(__variable_argv),
new AST_assign_statement(
new AST_array(
__parameter_definition(
symtable,
operator),
new AST_type(
__typedef_argument.type()),
new AST_identifier(__variable_argv))))
note how to the AST_array we pass the normal operators throught __parameter_definition, but also an AST_type, which will tell us at generation time which class to use for the array creation and also the name of the variable needed. The last said is needed to create the different array elements:
varname[0] = ...
varname[1] = ...
...
4) add the grammar to the JavaML4j
Exactly the same way done for grass models, we proceed for java models.
In __java_model I change the expression that was creating arrays the wrong way for groovy:
new AST_block(
__argument_definition(
( APT_argument_definition
)operator.argument_defs()
)
)
and change it with:
new AST_array(
__argument_definition((APT_argument_definition) operator
.argument_defs()),
new AST_type(__typedef_argv.type()),
new AST_identifier(__variable_argv))
The same is needed in __model_input and __model_output.
5) In eu.hydrologis.jgrass.console.core.runtime.compiler.AbstractML4j.java add the case.
In the method generate, crate a case based on the enum of 1) and create the proper generation of code there:
case AST_ARRAY:
/*
* this should be a set of strings (also concatenated) divided by commas
*/
targetCode.append("new "); //$NON-NLS-1$
AST
AST
AST
for( int i = 0; i <> child = op.getChild(i);
if (child.identifier().annotation().equals(ASTs.AST_TYPE.annotation())) {
typeChild = child;
}
if (child.identifier().annotation().equals(ASTs.AST_COMMA.annotation())) {
commaChild = child;
}
if (child.identifier().annotation().equals(ASTs.AST_IDENTIFIER.annotation())) {
variableChild = child;
}
}
if (typeChild != null && commaChild != null && variableChild != null) {
int nums = commaChild.size();
String arrayString = typeChild.expression();
arrayString = arrayString.substring(0, arrayString.length() - 1) + nums + "]";
targetCode.append(arrayString).append(";\n"); //$NON-NLS-1$
// now the arrays
String varName = variableChild.expression();
for( int i = 0; i < j =" 0;"> child = commaChild.getChild(i);
generate(indentCount + 1, child, targetCode);
targetCode.append(";\n"); //$NON-NLS-1$
}
}
break;
The result?
Now the JGrass Console can use Beanshell and Groovy by defining the language as a session setting (in the settings lines that start with # in the script).
But hei, images tell more than thousand words:

Go, closure, go!!!
Tuesday, August 26, 2008
JGrass now ships with OpenMI 1.4
Since I will attend the next OpenMI meeting, I am in fact playing a lot with it in this time.
Today I migrated JGrass to the new 1.4 openMi SDK.
For those that didn't find the new java version of openmi, here it goes from svn.
This is the official OATC version:
http://openmi.svn.sourceforge.net/viewvc/openmi/branches/OpenMI-1.4.1-de
v/MyOpenSource/Alterra/
Just for those that do not know. For JGrass we use a modified version that we make support the OGC SimpleFeature model and currently the JGrass rasters. We are working to get the OGC standard also for rasters in it.
Find infos about OpenMI here.
Today I migrated JGrass to the new 1.4 openMi SDK.
For those that didn't find the new java version of openmi, here it goes from svn.
This is the official OATC version:
http://openmi.svn.sourceforge.
v/MyOpenSource/Alterra/
Just for those that do not know. For JGrass we use a modified version that we make support the OGC SimpleFeature model and currently the JGrass rasters. We are working to get the OGC standard also for rasters in it.
Find infos about OpenMI here.
Friday, August 15, 2008
OpenMI "exposed" in JGrass
I finally took the time to understand how an extension point is created. Well, now a first step is done. I wanted to be able to serve JGrass and GRASS command through rcp extention points and be able to configure in that one also its GUI and menu entries, but for now what works is the creation of the command and its registration to the console engine. The gui stuff will also be there at some point. But for now let's have a look at the new way to create OpenMI enabled JGrass modules.
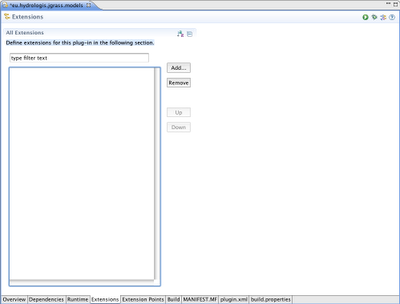
1) assuming you created a plugin , open your plugin.xml with the Manifest-Editor
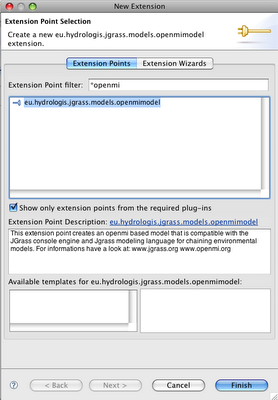
2) push the add button and in the upper filter part, type *openmi. Select the only entry left and push finish.
3) fill in some values for id, name, input and output items
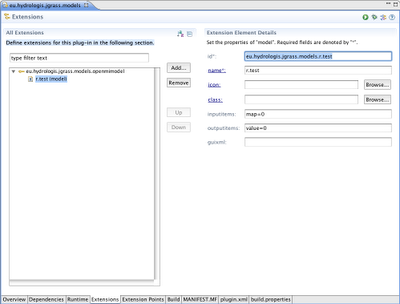
4) Assuming that you know what OpenMI is and that you know what you are doing, you are now going to implement the algorythm part. Click on the class and you will get a new java class wizard to help you. It will already propose you the needed class to extend and the proper actions.
The only thing you need to fill in are the package and the class name, but we had that already in step 3.
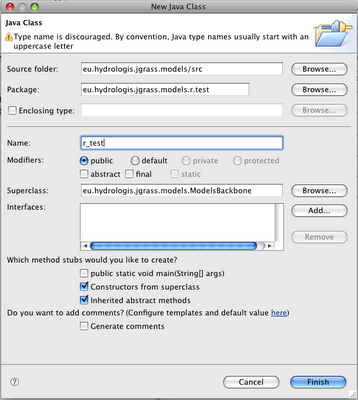
Pushing ok will create package and class template for you.
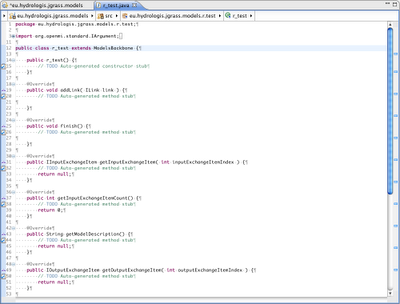
Well :), I know what you are thinking... but hell, no one ever told that OpenMI is an easy thing. I just say it is STANDARD, and that is GOOD!
So fill out your class in a proper way with the input and output items and at the next run of JGrass you will be able to use it in the console, since at startup Jgrass queries all openmimodel extension points and registers them with the console.
if you feel really lost, have a look at the many existing modules. For example h.pitfiller couls be a good one, since it just takes a map in input and creates one in output. Also use the mailinglist, if we can help you, we will.
1) assuming you created a plugin , open your plugin.xml with the Manifest-Editor

2) push the add button and in the upper filter part, type *openmi. Select the only entry left and push finish.

3) fill in some values for id, name, input and output items

4) Assuming that you know what OpenMI is and that you know what you are doing, you are now going to implement the algorythm part. Click on the class and you will get a new java class wizard to help you. It will already propose you the needed class to extend and the proper actions.
The only thing you need to fill in are the package and the class name, but we had that already in step 3.

Pushing ok will create package and class template for you.

Well :), I know what you are thinking... but hell, no one ever told that OpenMI is an easy thing. I just say it is STANDARD, and that is GOOD!
So fill out your class in a proper way with the input and output items and at the next run of JGrass you will be able to use it in the console, since at startup Jgrass queries all openmimodel extension points and registers them with the console.
if you feel really lost, have a look at the many existing modules. For example h.pitfiller couls be a good one, since it just takes a map in input and creates one in output. Also use the mailinglist, if we can help you, we will.
Subscribe to:
Posts (Atom)