Friday, September 26, 2008

Hydrology done by JGrass

Today I had to luck to assist in a hydrology lesson of professor Riccardo Rigon (this one done by Silvia) at the University of Trento. 60 young, wellbehaving, interested students sitting at the pcs I once upon a time was sitting (at that time using mapinfo)...

What an enormous feeling seeing them all use JGrass. Folks, here we are contributing to the formation of some of the future engineers... they are growing free!

Now I can really start relaxed to Cape Town.
This year we have 3 presentations, 1 workshop at the FOSS4G and a workshop for geography professors at a highschool in Cape Town.

After many years of struggles, these are all things that keep one's faith alive!
Cape Town, we are coming! :)


PS: if you are a hydrology/geomorphology teacher and want information about JGrass for education, feel free to contact us.

Wednesday, September 24, 2008

rcp cdrom permissions

You might wonder about the title, but that us exactly what I tried to google for when I tried to launch my rcp application (the GisPublisher, a minimal GIS to do data publishing from a readonly media like a DVD) from DVD.
Well, the application has a intro part inside which pdf documentation can be browsed, which is built on html pages that have to be dinamically created on application startup (see some screenshots under Pubblicazione DVD Pguap on this page).

To make a long story very short, the problem is that some files have to be parsed and modified, while the DVD id readonly.

Well, this has an easy solution, because the rcp system can copy a whole pile of files over to an ad-hoc created workspace on the users disk in his home folder.

To do so, you just have to create a config.ini file for the rcp product, which containes some lines like the following:


osgi.instance.area=@user.home/yourapp
osgi.configuration.area=@user.home/yourapp
osgi.sharedconfiguration.area=@user.home/yourapp


This in fact is not enough, and that can be the tricky part. To properly work, the plugins have to be exported packaged as individual jar archives (as the export dialog for plugins and fragments states) and not as folders.

Once those two easy things are done, the application will take a little while to startup the first time (depending on what it needs to copy over to the disk), but will work like a charm.
Wednesday, September 17, 2008

Notes on guidelines for writing readable code documentation

Last weekend the team of HydroloGIS went to visit the Geomatys team in Montpellier (mostly Martin and Adrian, which have the same attitude to work on weekends that we have :) ) . Apart of having a great time with those nice guys in discussing most of the scientific issues that rule the universe, we had a very long and good discussion about geoapi/geotools coverages (but that will be the content of another post at some point).

After having been amazed by the gorgeous level and readability of their code documentation (if you can find a non well documented class in this project, Martin would probably buy you a beer for having read it all :) ), I asked them to have a chat about code documentation. Well, what follows here are some notes about that chat.

Note that this will be related to javadoc documentation.

General rules:
  • Explain in you documentation why the class/method is used and how.
  • the first sentence of each javadoc is a short summary of what the class/methos/variable does. That sentence is put in every field reporting summary. It should therefore never start with a paragraph tag.
  • put always a first sentence, else you will end up with empty overviews in the documentation
  • For methods: always start with a verb. For fields: always start with a noun. For classes/interfaces: verb or noun, on a case-by-case basis. Of course exceptions can occurr...
  • end sentences with the dot.
  • document everything, especially public items
  • embed multiline code snippets in a pre tag. It will use a monospace font and write the contained parts in verbatim. Much better would be to create a taglet which could deal with formatting and coloring of the syntax.
  • if there are different constructors of the class, explain how and why you would use them.
  • lines should be at most 80 characters long.

Class annotations (minimum set to be used):
  • @author obviously defines the author. It will be converted to a comma separated list of authors in the case of more than one, so avoid to put commas in the author annotation. If you want to add the affiliation o fthe author, put it between brackets.
  • @since, @version a class may be there since version 1.0 and I may do some significant changes in version 2.0, in which case I upgrade the @version value to "2.0" but it doesn't allow me to remove this class. On the other hand, if I just introduced this class in version 2.0 (which would be indicated by @since 2.0) and I have not yet released this version of the software, then I still allowed to change my mind and remove this class/method.
  • @see here other classes, interfaces or methods can be referenced, that are somehow related to the current one
  • @deprecated defines that the class could disappear in future releases (usually the following one). Explain in this tag what the replacement is and if there is none, explain why.

Innline annotations:
  • @link defines a hyperlink inside the documentation to the related class. As a rule of tumb always link to a certain class only the first time it appears in the documentation block, in order to avoid to make the docu unreadable.
    • the basic syntax is {@link package.and.class.name}
    • it is possible to add a text for the link: {@link package.and.class.name text}, in order to make it more readable, instead of having just the name of the class.
    • link annotations are written in some monospace font and also permit the insertion of symbols like > and <.
    • in the case one would not want to have a monospace font, but instead the current font of the documentation, the @linkplain annotation can be exploited
    • links to methods are build the html anchor way with an #: {@link package.and.class.name#method}
  • @value this link can be used for example in the case of constant variables: {@value package.and.class.name#const} will supply that value in the javadoc
  • @code can be used for inline snipptes. They will be written in monospace font.

Package documentation:
  • to document a package, in recent versions of java, add a PackageInfo.java file containing the javadoc to the package.


I wrote this mostly because I need to get more consistent in my code documentation, but I will also try to create a small guide to put on the JGrass wiki out of this and future reviews, in order to pass it to beginning developers that join our team. Learning things properly from the start is much better than forcing ourself to get them later, when there seems to never be the time.

Thursday, September 4, 2008

Understanding --oscalar-out, --otable-out, --ochart-out

This is just a review of what can be done with models that return a resultset made of scalar values.

For this example I will use h.cb, which is a JGrass command which is used to calculate statistics between maps. The explanation of the comand is beyond this post. H.cb is used because it has 2 scalar outputs and with one go I can explain more usages.

1) --oscalar-xxx


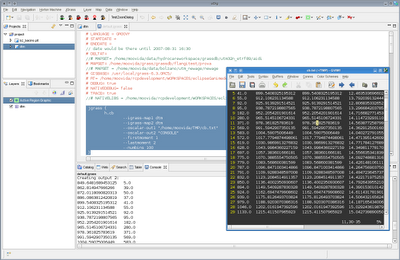
Oscalar can take the output and write it to console or to disk, formatted following the columns passed by the model.

The following usage:


jgrass {
h.cb
--igrass-map1 dtm
--igrass-map2 dtm
--oscalar-out1 "/home/moovida/TMP/cb.txt"
--oscalar-out2 "CONSOLE"
--firstmoment 1
--lastmoment 2
--numbins 100
}

will write one output to console and one to disk:


2) --otable-out

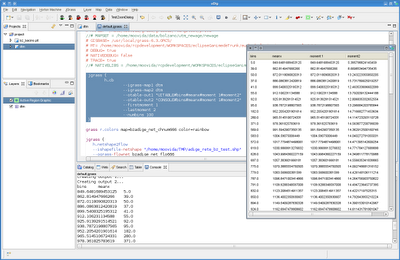
This does the same as oscalar, but adding the columns header that we supply in the command. Also it is possible to write to a widget.

The following syntax:


jgrass {
h.cb
--igrass-map1 dtm
--igrass-map2 dtm
--otable-out1 "UITABLE#bins#meanx#moment 1#moment2"
--otable-out2 "CONSOLE#bins#meanx"
--firstmoment 1
--lastmoment 2
--numbins 100
}

writes one output to a widget and one to the console:


By putting a file path instead of CONSOLE, the result goes to that file.

3) --ochart-out

This is a more complex one, since it creates a complete chart with the supplied data.

The syntax is made of:
- chart type
- chart title
- x axis label
- y axis label
- name of series 1
- name of series 2.... etc

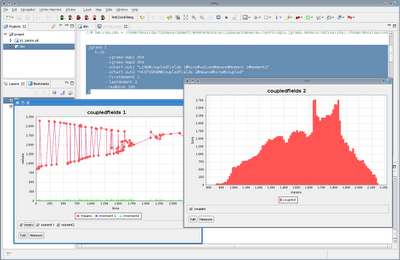
The follwoing command:

jgrass {
h.cb
--igrass-map1 dtm
--igrass-map2 dtm
--ochart-out1 "LINE#coupledfields 1#bins#values#meanx#moment 1#moment2"
--ochart-out2 "HISTOGRAM#coupledfields 2#meanx#bins#coupled"
--firstmoment 1
--lastmoment 2
--numbins 100
}


will lead you to: