# MAPSET= mapsetpath

// print out all available commands and variables
PRINTCOMMANDS

// access the current processing region attributes
echo NORTH
echo SOUTH
echo EAST
echo WEST
echo WERES
echo NSRES
echo ROWS
echo COLS

// or the region itself
echo ACTIVEREGION

// get the coordinate at a given row and col
def coordinate = coordinateFromRowCol(10, 15);
echo coordinate;

// get the nearest row and col to a given coordinate
def rowCol = rowColFromCoordinate(688605.0, 5108595.0);
echo rowCol;

/*
* reading and writing GRASS maps
*/
def grassMapName = "bacino_brenta_pit";

// get the full path of the map
def fullPath = fullMapPath (grassMapName);
echo fullPath;

// read the map
double[][] map = grassMapToMatrix (grassMapName);
// and print the output to console
printMap map

// get the average value
def avg = grassMapMax(grassMapName);
echo avg
// the same can be done for grassMapMin ,grassMapAvg, grassMapModa

// get the value of a grass raster map at a given coordinate
def value = valueOfGrassMapInCoordinate(grassMapName, 688605.0, 5108595.0);
echo value;

// write the matrix read before to a map named aaa
def grassMapToWrite = "aaa";
matrixToGrassMap (grassMapToWrite, map, -9999.0);

// delete the map from disk
deleteGrassMap grassMapToWrite;

// load a map to be viewed
loadGrassMap grassMapName;


/*
* working with vector layers and shapefiles
*/
// get the list of features from a layer
// that is loaded in the current active map
def features = getFeaturesFromLayer("countries");
features.each{ feature ->
// some features can be accessed directly on the feature,
// like area, length or the coordinates of the geometry
// as well as the centroid and the geometry itself
echo feature.area;
echo feature.length;
echo feature.coordinates[0];
echo feature.centroid;
echo feature.getAttribute("FIPS_CNTRY");
}

// the same can be done from a shapefile
def features = getFeaturesFromShapefile("D:\\data\\wb\\countries.shp");
features.each{ feature ->
echo feature.area;
echo feature.length;
echo feature.coordinates[0];
echo feature.centroid;
echo feature.getAttribute("FIPS_CNTRY");
}

// cql filters can be used from layers
def features = getFilteredFeaturesFromLayer("countries",
  "INTERSECTS(the_geom, LINESTRING (11 41, 18 41))");
features.each{ feature ->
echo feature.area;
echo feature.length;
echo feature.coordinates[0];
echo feature.centroid;
echo feature.getAttribute("FIPS_CNTRY");
}

// or again from shapefiles
def features = getFilteredFeaturesFromShapefile("D:\\dat\\wb\\countries.shp",
"LONG_NAME == 'Russia'");
features.each{ feature ->
echo feature.area;
echo feature.length;
echo feature.coordinates[0];
echo feature.centroid;
echo feature.getAttribute("FIPS_CNTRY");
}

// statistics can be calculated on fields of the features
// average of the field SQKM
def avg = featuresLayerAvg("countries", "SQKM");
echo avg;
avg = shapefileAvg("D:\\data\\wb\\countries.shp", "SQKM");
echo avg;

// min of the field SQKM
def min = featuresLayerMin("countries", "SQKM");
echo min;
min = shapefileMin("D:\\data\\wb\\countries.shp", "SQKM");
echo min;

// max of the field SQKM
def max = featuresLayerMax("countries", "SQKM");
echo max;
max = shapefileMax("D:\\data\\wb\\countries.shp", "SQKM");
echo max;

// moda of the field SQKM
def moda = shapefileModa("D:\\data\\wb\\countries.shp", "SQKM");
echo moda;
moda = featuresLayerModa("countries", "SQKM");
echo moda;


/*
* DATABASE COMMANDS (assuming table has two fields: id, name)
*/
// define the database connection
# REMOTEDBURL = postgresql:192.168.1.102:5432:dbname:user:passwd

// the table name
def table = 'schema.tablename';

// get the dataset and browse over it
def ds = dataset( table );
ds.each{
// "name" is a db table field name and can be
// used as variable to access the needed value
echo it.id + "  " + it.name;
}

// another way is to use select statements
def rows = select ("* from " + table);
rows.each{ row ->
echo row.id + "  " + row.name
}

// which can contain also the where clause
def rows1 = select ("* from " + table + " where name = 'coudiness'");
rows1.each{ row ->
echo row.id + "  " + row.name;
}

// for counting rows there is
def num = count(table);
echo num;
// on which the where clause also works
def num1 = count( table + " where name = 'coudiness'");
echo num1;

// for eveything else the database instance can be accessed
// and any query can be executed
DB.eachRow("select * from " + table){
echo it.id + "  " + it.name;
}


/*
* data import and export
*/
// import an esri ascii grid to grass raster map
importEsriAscii("C:\\TMP\\brenta2.asc", "testascii");

// import a tiff to grass raster map
importTiff("C:\\TMP\\brenta2.tif", "testtiff");

// import grass raster map to an esri ascii grid
exportEsriAscii("bacino_brenta_pit", "C:\\TMP\\brenta2");

// import grass raster map to a tiff
exportTiff("bacino_brenta_pit", "C:\\TMP\\brenta2");

/*
* the mapcalculator
*/
mapcalc {
result "mapcalctest"
function """
 if ("bacino_brenta_pit" > 1200,
    1.0,
    "bacino_brenta_pit" / 2.0)
"""
}
Showing posts with label console. Show all posts
Showing posts with label console. Show all posts
Sunday, January 31, 2010
new console language extentions arriving
Not much to say...


Sunday, March 8, 2009
Variable names in console
In the past users reported problems with scripts, in which maps were not found. If you have numbers in the first part of your map name, read this, it might help you out.
The words that can be used as a variable name, are tested to match the following regular expression:
^[$][a-zA-Z_]+[a-zA-Z0-9_]?+$
This probably won't help most of the users at that point (it will developers), but it solves the above cited problem, since it states that in the first "piece" of variable name there can't be numbers:
So by changing for example something like
$d2o3d_map
to
$dtwoothreed_map
the thing might work properly.
Sunday, March 1, 2009
Expanding the console language - part III
It is now possible to directly access database with groovy's very powerful features.
Few steps are required:
1) add the database definition to the script settings
# REMOTEDBURL = postgresql:host:5432:database:user:password
2) request the groovy SQL connection
def sql = getDbConnection()
3) execute the query and do something with the result
sql.eachRow(the_query){
// the closure
}
That would all look like:

Few steps are required:
1) add the database definition to the script settings
# REMOTEDBURL = postgresql:host:5432:database:user:password
2) request the groovy SQL connection
def sql = getDbConnection()
3) execute the query and do something with the result
sql.eachRow(the_query){
// the closure
}
That would all look like:

Saturday, February 21, 2009
Expanding the console language - part II
Now the console has some keywords that refer to the active region values, i.e. limits, resolution and rows and columns.
I think an example is more than self explaining about the usage.
The following
My example result is:
n = 5204514.51713
s = 5141634.51713
e = 686136.82243
w = 601576.82243
xres = 40.0
yres = 40.0
rows = 1572
cols = 2114
Updated active region...
n = 5204514.51713
s = 5141634.51713
e = 686136.82243
w = 601576.82243
xres = 20.0
yres = 20.0
rows = 3144
cols = 4228
I think an example is more than self explaining about the usage.
The following
- prints to console the values of the active region
- uses the GRASS command g.region to change the resolution to 20 meters (as you can see it was 40 before)
- updates the script's variables region values to the new set (very important)
- prints out the new active region values
println "n = " + NORTH()
println "s = " + SOUTH()
println "e = " + EAST()
println "w = " + WEST()
println "xres = " + WERES()
println "yres = " + NSRES()
println "rows = " + ROWS()
println "cols = " + COLS()

grass g.region.exe res = 20

updateActiveregion()

println "n = " + NORTH()
println "s = " + SOUTH()
println "e = " + EAST()
println "w = " + WEST()
println "xres = " + WERES()
println "yres = " + NSRES()
println "rows = " + ROWS()
println "cols = " + COLS()
My example result is:
n = 5204514.51713
s = 5141634.51713
e = 686136.82243
w = 601576.82243
xres = 40.0
yres = 40.0
rows = 1572
cols = 2114
Updated active region...
n = 5204514.51713
s = 5141634.51713
e = 686136.82243
w = 601576.82243
xres = 20.0
yres = 20.0
rows = 3144
cols = 4228
Sunday, December 28, 2008
Expanding the console language
We are finally starting to expand a bit the console scripting language.
What does that mean?
Well, that to get a martix of data from a map you now can write:
def matrix = fromMap("mapname")
and then access as an array the matrix.
The same works the way round:
toMap "mapName", matrix
Note that if the method returns a value, you need the brackets around the parameters.
What else?
You can now load a raster to be visible like that:
load "mapname"
And how many times did you want to isolate some maps from a mapset full of maps, to give just those to a collaborator?
Now you do it like that:
copyToNewMapset "test", "adigeall_dtm", "adigeall_pit", "adigeall_flow"
which will create a new mapset (in this case named test) inside the current location and copy there just the maps you want (which in this case are 3).
Delete maps?
deleteMaps "adigeall_dtm", "adigeall_pit"
And more will come when it is needed. If you have cool ideas please let me know here, in the jGrass list or even better open a bug request for new feature.
What does that mean?
Well, that to get a martix of data from a map you now can write:
def matrix = fromMap("mapname")
and then access as an array the matrix.
The same works the way round:
toMap "mapName", matrix
Note that if the method returns a value, you need the brackets around the parameters.
What else?
You can now load a raster to be visible like that:
load "mapname"
And how many times did you want to isolate some maps from a mapset full of maps, to give just those to a collaborator?
Now you do it like that:
copyToNewMapset "test", "adigeall_dtm", "adigeall_pit", "adigeall_flow"
which will create a new mapset (in this case named test) inside the current location and copy there just the maps you want (which in this case are 3).
Delete maps?
deleteMaps "adigeall_dtm", "adigeall_pit"
And more will come when it is needed. If you have cool ideas please let me know here, in the jGrass list or even better open a bug request for new feature.
Wednesday, December 17, 2008
Monday, October 13, 2008
How to get GRASS related preferences into your code
What to do when you need the mapset that is currently set for doing calculations or even the path to the GRASS GISBASE?
Go and buy some at your preferred store:
Go and buy some at your preferred store:
           ScopedPreferenceStore preferences = (ScopedPreferenceStore) ConsoleEditorPlugin
                   .getDefault().getPreferenceStore();

           String mapsetString = preferences.getString(PreferencesInitializer.CONSOLE_ARGV_MAPSET);

           String gisbaseString = preferences
                   .getString(PreferencesInitializer.CONSOLE_ARGV_GISBASE);
Thursday, September 4, 2008
Understanding --oscalar-out, --otable-out, --ochart-out
This is just a review of what can be done with models that return a resultset made of scalar values.
For this example I will use h.cb, which is a JGrass command which is used to calculate statistics between maps. The explanation of the comand is beyond this post. H.cb is used because it has 2 scalar outputs and with one go I can explain more usages.
1) --oscalar-xxx
Oscalar can take the output and write it to console or to disk, formatted following the columns passed by the model.
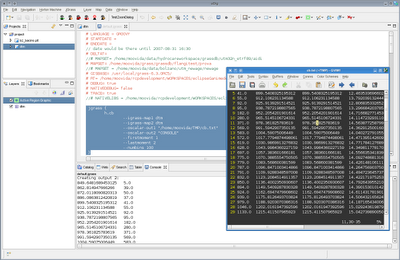
The following usage:
will write one output to console and one to disk:
2) --otable-out
This does the same as oscalar, but adding the columns header that we supply in the command. Also it is possible to write to a widget.
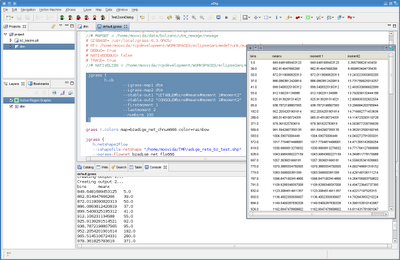
The following syntax:
writes one output to a widget and one to the console:
By putting a file path instead of CONSOLE, the result goes to that file.
3) --ochart-out
This is a more complex one, since it creates a complete chart with the supplied data.
The syntax is made of:
- chart type
- chart title
- x axis label
- y axis label
- name of series 1
- name of series 2.... etc
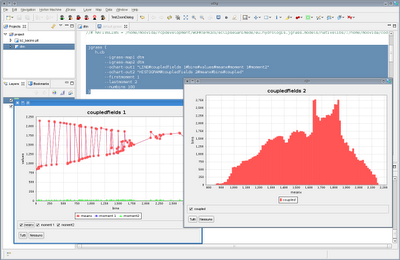
The follwoing command:
will lead you to:
For this example I will use h.cb, which is a JGrass command which is used to calculate statistics between maps. The explanation of the comand is beyond this post. H.cb is used because it has 2 scalar outputs and with one go I can explain more usages.
1) --oscalar-xxx
Oscalar can take the output and write it to console or to disk, formatted following the columns passed by the model.
The following usage:
jgrass {
h.cb
       --igrass-map1 dtm
       --igrass-map2 dtm
       --oscalar-out1 "/home/moovida/TMP/cb.txt"
       --oscalar-out2 "CONSOLE"
       --firstmoment 1
       --lastmoment 2
       --numbins 100
}
will write one output to console and one to disk:

2) --otable-out
This does the same as oscalar, but adding the columns header that we supply in the command. Also it is possible to write to a widget.
The following syntax:
jgrass {
 h.cb
         --igrass-map1 dtm
         --igrass-map2 dtm
         --otable-out1 "UITABLE#bins#meanx#moment 1#moment2"
         --otable-out2 "CONSOLE#bins#meanx"
         --firstmoment 1
         --lastmoment 2
         --numbins 100
}
writes one output to a widget and one to the console:

By putting a file path instead of CONSOLE, the result goes to that file.
3) --ochart-out
This is a more complex one, since it creates a complete chart with the supplied data.
The syntax is made of:
- chart type
- chart title
- x axis label
- y axis label
- name of series 1
- name of series 2.... etc
The follwoing command:
jgrass {
h.cb
   --igrass-map1 dtm
   --igrass-map2 dtm
   --ochart-out1 "LINE#coupledfields 1#bins#values#meanx#moment 1#moment2"
   --ochart-out2 "HISTOGRAM#coupledfields 2#meanx#bins#coupled"
   --firstmoment 1
   --lastmoment 2
   --numbins 100
}
will lead you to:

Sunday, August 31, 2008
How to create a contour map: asking GRASS for help - part I
As you probably know, JGrass can execute GRASS command, which makes it a really powerfull funbox.
So what if I want to extract a shapefile of contour lines from a DTM?
And we go from:
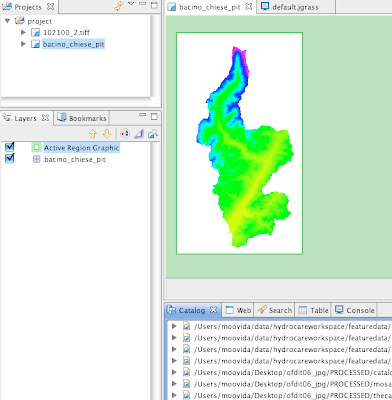
through:
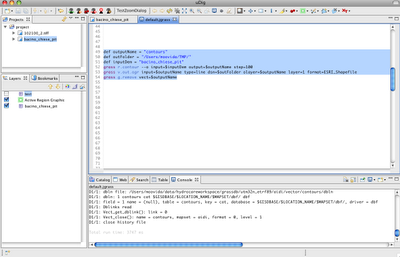
to the needed layer:
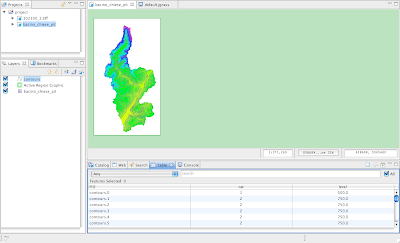
So what if I want to extract a shapefile of contour lines from a DTM?
def outputName = "contours"
def outFolder = "/Users/moovida/TMP/"
def inputDem = "bacino_chiese_pit"
grass r.contour --o input=$inputDem output=$outputName step=250
grass v.out.ogr input=$outputName type=line dsn=$outFolder olayer=$outputName layer=1 format=ESRI_Shapefile
grass g.remove vect=$outputName
And we go from:

through:

to the needed layer:

Geosolutions coverage tools in Udig / JGrass
It is some time now that the Geo-solutions guys created at geotools level tools for tiling, mosaicing and creating overviews of images.
It was really time to have them in udig to use them on those images that trouble us with memory overload.
I have thought a thousand of times about creating a wizard at Udig level, so it could be in the standard Udig, but in the end I brought it as OpenMI based module into JGrass for several small reasons, but one main reason. As JGrass module it is scriptable and it also gets almost automagically a gui. Also the scripts can be launched with the console in standalone mode on serverside. So after a small discussion with Simone of Geosolutions we decided for them to be a JGrass module.
That means that to use those for now you will have to load the JGrass plugins.
So, what are those coverage tools?
Imagine a schenario of the following kind: you have 25 geotiffs, that take one hour to load the first 3 of them and than freezes udig and at some point breakes completely.
This is probably due to the fact that those geotiffs do not have overviews.
Now you can solve it from Udig with the following:
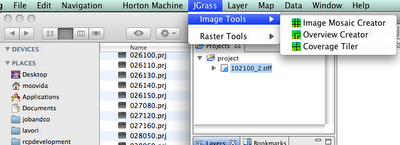
Choose the Overview creator and you will get a dialog:
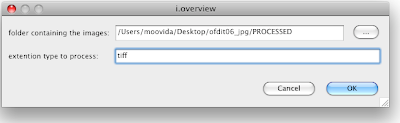 enter the folder and the extention of your images and press ok. The overview tool takes a hell of a time and for that hell of a time on my pc it takes all resources. And I mean ALL. Launch it best before going to sleep.
After the creation of overviews, your geotiffs should load really fast and without sucking your pc memory. Now I get really quickly my images loaded:
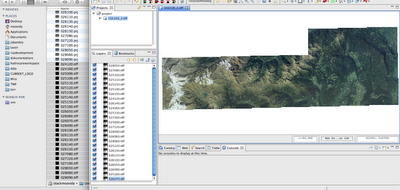
Well, what we do not like, is that we have 25 layers with one image each.
That is why in the coveragetools there is also an Image Mosaic Creator. Launch it:
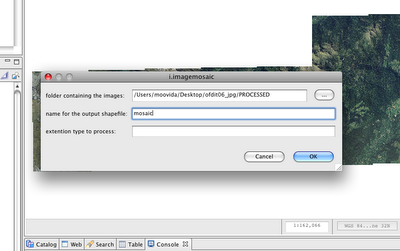
Since the extension defaults to tiff, I can omit it.
After a few seconds the shapefile is created and if I load it, the result is the following:

Two main differences:
1) the layer is just the one of the shapefile that loads all the geotiffs (great!!)
2) the background of missing tiles is black (ugly)
There is also a third tool, the Image tiler, which splits an image into smaller pieces of the dimension the user supplies.
Alright, as promised for a bit more advanced users the same commands can be accessed from the console. In that mode it will be also possible to tweak some flags and values, which in the gui are set to default.
The scripts look like that:
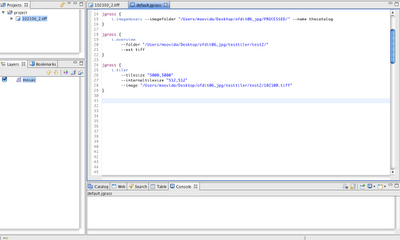
This is really a nice set of tools for all those that do not have much memory.
The downside of the tools is that they work with the new geotools and therefore only with the new development version. But hey, in Cape Town we will try to use that one, so you will be able to get your Udig with all the tools in it by next month.
It was really time to have them in udig to use them on those images that trouble us with memory overload.
I have thought a thousand of times about creating a wizard at Udig level, so it could be in the standard Udig, but in the end I brought it as OpenMI based module into JGrass for several small reasons, but one main reason. As JGrass module it is scriptable and it also gets almost automagically a gui. Also the scripts can be launched with the console in standalone mode on serverside. So after a small discussion with Simone of Geosolutions we decided for them to be a JGrass module.
That means that to use those for now you will have to load the JGrass plugins.
So, what are those coverage tools?
Imagine a schenario of the following kind: you have 25 geotiffs, that take one hour to load the first 3 of them and than freezes udig and at some point breakes completely.
This is probably due to the fact that those geotiffs do not have overviews.
Now you can solve it from Udig with the following:

Choose the Overview creator and you will get a dialog:
 enter the folder and the extention of your images and press ok. The overview tool takes a hell of a time and for that hell of a time on my pc it takes all resources. And I mean ALL. Launch it best before going to sleep.
After the creation of overviews, your geotiffs should load really fast and without sucking your pc memory. Now I get really quickly my images loaded:

Well, what we do not like, is that we have 25 layers with one image each.
That is why in the coveragetools there is also an Image Mosaic Creator. Launch it:

Since the extension defaults to tiff, I can omit it.
After a few seconds the shapefile is created and if I load it, the result is the following:

Two main differences:
1) the layer is just the one of the shapefile that loads all the geotiffs (great!!)
2) the background of missing tiles is black (ugly)
There is also a third tool, the Image tiler, which splits an image into smaller pieces of the dimension the user supplies.
Alright, as promised for a bit more advanced users the same commands can be accessed from the console. In that mode it will be also possible to tweak some flags and values, which in the gui are set to default.
The scripts look like that:

This is really a nice set of tools for all those that do not have much memory.
The downside of the tools is that they work with the new geotools and therefore only with the new development version. But hey, in Cape Town we will try to use that one, so you will be able to get your Udig with all the tools in it by next month.
Friday, August 29, 2008
New JGrass tools to query and correct raster maps
d.what.rast
With JGrass under the info tools in the gui you can find the "Query tool" or in GRASS language d.what.rast.
By selecting one or more maps you are able to query a particular coordinate to get the raster value for that, together with some useful position info.
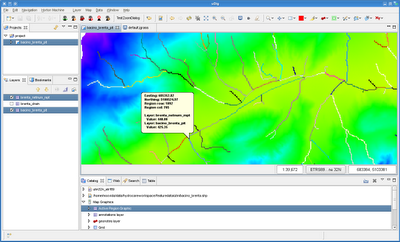
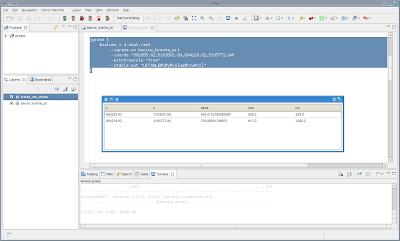
Now the same can be achieved from the console with more than one coordinate in order to get a list of coordinates and values to be used in the script:
will gain:
r.correct
In the same info icon menu you can find the Correct tool, or better known as r.correct.
Even if some of you might find it useless, some of us will need it for everyday's work. It gives the possibility to correct manually pixel values of a raster map.
For example here I have a map with a river (which pixels contain the channelnumber) network over an elevation model map. Note that the river map has novalues were there is no river.
If I click with the r.correct tool on a point on the river network, a dialog with a table containing the raster values opens and I am able to change those values and save the map (overwriting the old or creating a new one).
Note also that you have buttons all around the table that let you navigate the raster, if there are other values around you want to change.
The same of above by image:
1) click the point on the network in the area you want to change:
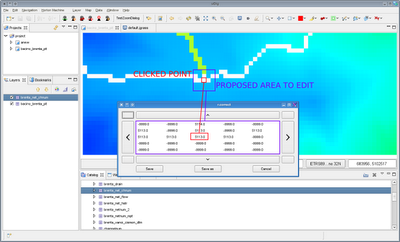
2) change the value of the pixel you want to change. In this case let's just split the network arm from the main network. Split means set a value to novalue, which by default is -9999.0:

3) save and hit refresh to redraw the map. The river is split:

With JGrass under the info tools in the gui you can find the "Query tool" or in GRASS language d.what.rast.
By selecting one or more maps you are able to query a particular coordinate to get the raster value for that, together with some useful position info.

Now the same can be achieved from the console with more than one coordinate in order to get a list of coordinates and values to be used in the script:
jgrass {
$values = d.what.rast
--igrass-in bacino_brenta_pit
--coords "692055.62,5103501.69,694218.62,5105772.84"
 --printrowcols "true"
--otable-out "UITABLE#x#y#value#row#col"
}
will gain:

r.correct
In the same info icon menu you can find the Correct tool, or better known as r.correct.
Even if some of you might find it useless, some of us will need it for everyday's work. It gives the possibility to correct manually pixel values of a raster map.
For example here I have a map with a river (which pixels contain the channelnumber) network over an elevation model map. Note that the river map has novalues were there is no river.
If I click with the r.correct tool on a point on the river network, a dialog with a table containing the raster values opens and I am able to change those values and save the map (overwriting the old or creating a new one).
Note also that you have buttons all around the table that let you navigate the raster, if there are other values around you want to change.
The same of above by image:
1) click the point on the network in the area you want to change:

2) change the value of the pixel you want to change. In this case let's just split the network arm from the main network. Split means set a value to novalue, which by default is -9999.0:

3) save and hit refresh to redraw the map. The river is split:

Thursday, August 28, 2008
The rasterizing tools are back in town
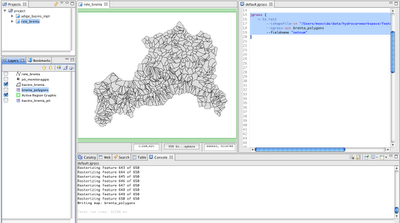
The v.to.rast tool is back:
Executing that converts from:
to that:
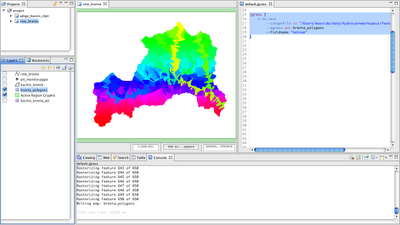
In this case conversion is based on the value in a field of the shape and on polygons. Obviously it works for all the geometry types.
jgrass {
v.to.rast
--ishapefile-in "/Users/moovida/data/hydrocareworkspace/featuredata/utm/bacino_brenta.shp"
 --ograss-out brenta_polygons
 --fieldname "netnum"
}
Executing that converts from:

to that:

In this case conversion is based on the value in a field of the shape and on polygons. Obviously it works for all the geometry types.
Wednesday, August 27, 2008
How to read a grass raster and script on it
I just added a r.read command to the console commands list. Currently it can read grass raster.
The console scripting code:
Please note that groovy really doesn't need type declaration.
Well on the raster data you could do some nice calculus:
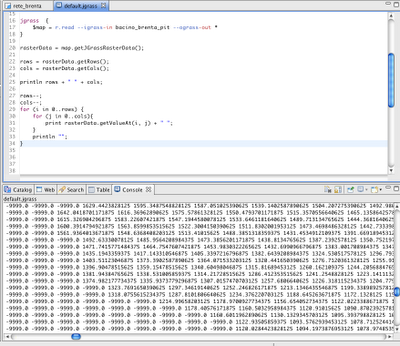
The console scripting code:
jgrass {
$map = r.read --igrass-in bacino_brenta_pit --ograss-out *
}

rasterData = map.getJGrassRasterData();

rows = rasterData.getRows();
cols = rasterData.getCols();

println rows + " " + cols;

rows--;
cols--;
for (i in 0..rows) {
for (j in 0..cols){
 print rasterData.getValueAt(i, j) + " ";
}
println "";
}
Please note that groovy really doesn't need type declaration.
Well on the raster data you could do some nice calculus:

How to add a new piece to the console
For several good resaons I wanted to teach the JGrass Console to speak groovy.
Well, since groovy supports java syntax, I thought this would go on the fly, but I was very, very wrong.
Nevertheless the speed of Groovy in handling files and many other things forced me to get my fingers dirty in the console compiler system, an IT magic created in coorperation with Andreas Hamm last year.
So the problems found were basically 3:
1) java blocks without labels are not supported in groovy, because of their ambiguity with closures
2) the direct assignment array construct is not supported: String[] str = {"a", "b"};
3) the Classloader works differently from the one of beanshell, and we don't see the needed classes
So Hamm and I spent an evening together in chat to make me understand how the internals of the console work.
And here I want to share that with you, by showing you how I solved problem 2, which contains also 1.It is not for the weak of heart (also because the code snippets are not well formatted), but believe me, after a starting desperation, I had quite some fun :)
0) identification of the problem
Groovy doesn't support an array creation like:
String[] __arg_v = {"a", "b" };
we need to change it to:
Argument[] __arg_v = new Argument[2];
__arg_v[0] = "a";
__arg_v[1] = "b";
and this should be general also to other types of arrays.
The problem in this case that no Abstract Syntax Tree operator was available to deal with array and therefor a new piece of syntac had to be created.
Step by step this was done like that:
1) add a new enumeration type to eu.hydrologis.jgrass.console.core.runtime.analysis.ASTs.java
In this case I added:
/**
*
* The identifier of an operator of the
* array e.g., "array[2]; array[0] = string1; array[1] = string2;
*
*
* @see eu.hydrologis.jgrass.console.core.runtime.nodes.AST_while
*/
AST_ARRAY(null, "ARRAY"); //$NON-NLS-1$
2) add a new class in eu.hydrologis.jgrass.console.core.runtime.nodes
ex. AST_array with a Default constructor and a Copyconstruktor
public final class AST_array extends AbstractAST implements AST {
// Construction
/**
*
* Constructs this object.
*
*/
public AST_array() {
super(ASTs.AST_ARRAY.expression(), ASTs.AST_ARRAY.annotation(), ASTs.AST_ARRAY);
} // AST_array
/**
*
* Constructs this object with the specified operands.
*
*
* @param operands - can be
*/
public AST_array( AST... operands ) {
super(ASTs.AST_ARRAY.expression(), ASTs.AST_ARRAY.annotation(), ASTs.AST_ARRAY, operands);
} // AST_array
} // AST_array
3) add the grammar to the NativeML4j
Add the Argument array type:
final SYM_type_array __typedef_argument = new SYM_type_array("Argument"); //$NON-NLS-1$
Search for the part in which the proper child is added in the method __native_model.
Before:
Argument[] args = {arg1, arg2}
Created by:
new AST_expression(
new AST_variable_definition(
new AST_type(__typedef_argv.type()),
new AST_identifier(__variable_argv),
new AST_assign_statement(
new AST_block(
__parameter_definition(
symtable,
operator))))),
Now we need an array, which changes things to the following:
new AST_variable_definition(
new AST_type(__typedef_argv.type()),
new AST_identifier(__variable_argv),
new AST_assign_statement(
new AST_array(
__parameter_definition(
symtable,
operator),
new AST_type(
__typedef_argument.type()),
new AST_identifier(__variable_argv))))
note how to the AST_array we pass the normal operators throught __parameter_definition, but also an AST_type, which will tell us at generation time which class to use for the array creation and also the name of the variable needed. The last said is needed to create the different array elements:
varname[0] = ...
varname[1] = ...
...
4) add the grammar to the JavaML4j
Exactly the same way done for grass models, we proceed for java models.
In __java_model I change the expression that was creating arrays the wrong way for groovy:
new AST_block(
__argument_definition(
( APT_argument_definition
)operator.argument_defs()
)
)
and change it with:
new AST_array(
__argument_definition((APT_argument_definition) operator
.argument_defs()),
new AST_type(__typedef_argv.type()),
new AST_identifier(__variable_argv))
The same is needed in __model_input and __model_output.
5) In eu.hydrologis.jgrass.console.core.runtime.compiler.AbstractML4j.java add the case.
In the method generate, crate a case based on the enum of 1) and create the proper generation of code there:
case AST_ARRAY:
/*
* this should be a set of strings (also concatenated) divided by commas
*/
targetCode.append("new "); //$NON-NLS-1$
AST typeChild = null;
AST commaChild = null;
AST variableChild = null;
for( int i = 0; i <> child = op.getChild(i);
if (child.identifier().annotation().equals(ASTs.AST_TYPE.annotation())) {
typeChild = child;
}
if (child.identifier().annotation().equals(ASTs.AST_COMMA.annotation())) {
commaChild = child;
}
if (child.identifier().annotation().equals(ASTs.AST_IDENTIFIER.annotation())) {
variableChild = child;
}
}
if (typeChild != null && commaChild != null && variableChild != null) {
int nums = commaChild.size();
String arrayString = typeChild.expression();
arrayString = arrayString.substring(0, arrayString.length() - 1) + nums + "]";
targetCode.append(arrayString).append(";\n"); //$NON-NLS-1$
// now the arrays
String varName = variableChild.expression();
for( int i = 0; i < j =" 0;"> child = commaChild.getChild(i);
generate(indentCount + 1, child, targetCode);
targetCode.append(";\n"); //$NON-NLS-1$
}
}
break;
The result?
Now the JGrass Console can use Beanshell and Groovy by defining the language as a session setting (in the settings lines that start with # in the script).
But hei, images tell more than thousand words:
Go, closure, go!!!
Well, since groovy supports java syntax, I thought this would go on the fly, but I was very, very wrong.
Nevertheless the speed of Groovy in handling files and many other things forced me to get my fingers dirty in the console compiler system, an IT magic created in coorperation with Andreas Hamm last year.
So the problems found were basically 3:
1) java blocks without labels are not supported in groovy, because of their ambiguity with closures
2) the direct assignment array construct is not supported: String[] str = {"a", "b"};
3) the Classloader works differently from the one of beanshell, and we don't see the needed classes
So Hamm and I spent an evening together in chat to make me understand how the internals of the console work.
And here I want to share that with you, by showing you how I solved problem 2, which contains also 1.It is not for the weak of heart (also because the code snippets are not well formatted), but believe me, after a starting desperation, I had quite some fun :)
0) identification of the problem
Groovy doesn't support an array creation like:
String[] __arg_v = {"a", "b" };
we need to change it to:
Argument[] __arg_v = new Argument[2];
__arg_v[0] = "a";
__arg_v[1] = "b";
and this should be general also to other types of arrays.
The problem in this case that no Abstract Syntax Tree operator was available to deal with array and therefor a new piece of syntac had to be created.
Step by step this was done like that:
1) add a new enumeration type to eu.hydrologis.jgrass.console.core.runtime.analysis.ASTs.java
In this case I added:
/**
*
* The identifier of an operator of the
array keyword for the creation of an* array e.g., "array[2]; array[0] = string1; array[1] = string2;
*
*
* @see eu.hydrologis.jgrass.console.core.runtime.nodes.AST_while
*/
AST_ARRAY(null, "ARRAY"); //$NON-NLS-1$
2) add a new class in eu.hydrologis.jgrass.console.core.runtime.nodes
ex. AST_array with a Default constructor and a Copyconstruktor
public final class AST_array extends AbstractAST
// Construction
/**
*
*
*/
public AST_array() {
super(ASTs.AST_ARRAY.expression(), ASTs.AST_ARRAY.annotation(), ASTs.AST_ARRAY);
} // AST_array
/**
*
* Constructs this object with the specified operands.
*
*
* @param operands - can be
null or either a single operand or a list of operands.*/
public AST_array( AST
super(ASTs.AST_ARRAY.expression(), ASTs.AST_ARRAY.annotation(), ASTs.AST_ARRAY, operands);
} // AST_array
} // AST_array
3) add the grammar to the NativeML4j
Add the Argument array type:
final SYM_type_array __typedef_argument = new SYM_type_array("Argument"); //$NON-NLS-1$
Search for the part in which the proper child is added in the method __native_model.
Before:
Argument[] args = {arg1, arg2}
Created by:
new AST_expression(
new AST_variable_definition(
new AST_type(__typedef_argv.type()),
new AST_identifier(__variable_argv),
new AST_assign_statement(
new AST_block(
__parameter_definition(
symtable,
operator))))),
Now we need an array, which changes things to the following:
new AST_variable_definition(
new AST_type(__typedef_argv.type()),
new AST_identifier(__variable_argv),
new AST_assign_statement(
new AST_array(
__parameter_definition(
symtable,
operator),
new AST_type(
__typedef_argument.type()),
new AST_identifier(__variable_argv))))
note how to the AST_array we pass the normal operators throught __parameter_definition, but also an AST_type, which will tell us at generation time which class to use for the array creation and also the name of the variable needed. The last said is needed to create the different array elements:
varname[0] = ...
varname[1] = ...
...
4) add the grammar to the JavaML4j
Exactly the same way done for grass models, we proceed for java models.
In __java_model I change the expression that was creating arrays the wrong way for groovy:
new AST_block(
__argument_definition(
( APT_argument_definition
)operator.argument_defs()
)
)
and change it with:
new AST_array(
__argument_definition((APT_argument_definition) operator
.argument_defs()),
new AST_type(__typedef_argv.type()),
new AST_identifier(__variable_argv))
The same is needed in __model_input and __model_output.
5) In eu.hydrologis.jgrass.console.core.runtime.compiler.AbstractML4j.java add the case.
In the method generate, crate a case based on the enum of 1) and create the proper generation of code there:
case AST_ARRAY:
/*
* this should be a set of strings (also concatenated) divided by commas
*/
targetCode.append("new "); //$NON-NLS-1$
AST
AST
AST
for( int i = 0; i <> child = op.getChild(i);
if (child.identifier().annotation().equals(ASTs.AST_TYPE.annotation())) {
typeChild = child;
}
if (child.identifier().annotation().equals(ASTs.AST_COMMA.annotation())) {
commaChild = child;
}
if (child.identifier().annotation().equals(ASTs.AST_IDENTIFIER.annotation())) {
variableChild = child;
}
}
if (typeChild != null && commaChild != null && variableChild != null) {
int nums = commaChild.size();
String arrayString = typeChild.expression();
arrayString = arrayString.substring(0, arrayString.length() - 1) + nums + "]";
targetCode.append(arrayString).append(";\n"); //$NON-NLS-1$
// now the arrays
String varName = variableChild.expression();
for( int i = 0; i < j =" 0;"> child = commaChild.getChild(i);
generate(indentCount + 1, child, targetCode);
targetCode.append(";\n"); //$NON-NLS-1$
}
}
break;
The result?
Now the JGrass Console can use Beanshell and Groovy by defining the language as a session setting (in the settings lines that start with # in the script).
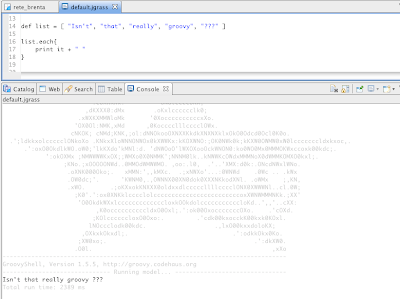
But hei, images tell more than thousand words:

Go, closure, go!!!
Tuesday, August 26, 2008
JGrass now ships with OpenMI 1.4
Since I will attend the next OpenMI meeting, I am in fact playing a lot with it in this time.
Today I migrated JGrass to the new 1.4 openMi SDK.
For those that didn't find the new java version of openmi, here it goes from svn.
This is the official OATC version:
http://openmi.svn.sourceforge.net/viewvc/openmi/branches/OpenMI-1.4.1-de
v/MyOpenSource/Alterra/
Just for those that do not know. For JGrass we use a modified version that we make support the OGC SimpleFeature model and currently the JGrass rasters. We are working to get the OGC standard also for rasters in it.
Find infos about OpenMI here.
Today I migrated JGrass to the new 1.4 openMi SDK.
For those that didn't find the new java version of openmi, here it goes from svn.
This is the official OATC version:
http://openmi.svn.sourceforge.
v/MyOpenSource/Alterra/
Just for those that do not know. For JGrass we use a modified version that we make support the OGC SimpleFeature model and currently the JGrass rasters. We are working to get the OGC standard also for rasters in it.
Find infos about OpenMI here.
Friday, August 15, 2008
OpenMI "exposed" in JGrass
I finally took the time to understand how an extension point is created. Well, now a first step is done. I wanted to be able to serve JGrass and GRASS command through rcp extention points and be able to configure in that one also its GUI and menu entries, but for now what works is the creation of the command and its registration to the console engine. The gui stuff will also be there at some point. But for now let's have a look at the new way to create OpenMI enabled JGrass modules.
1) assuming you created a plugin , open your plugin.xml with the Manifest-Editor
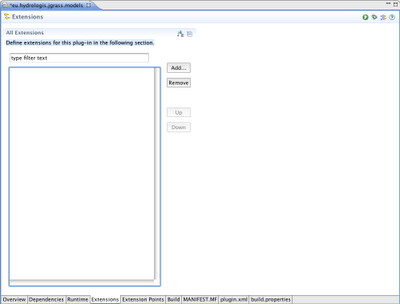
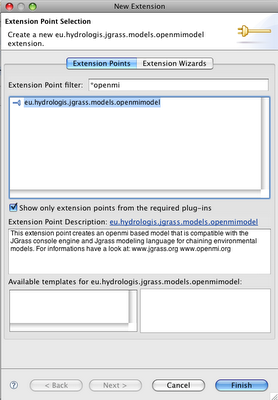
2) push the add button and in the upper filter part, type *openmi. Select the only entry left and push finish.
3) fill in some values for id, name, input and output items
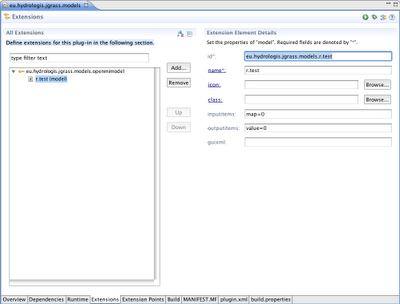
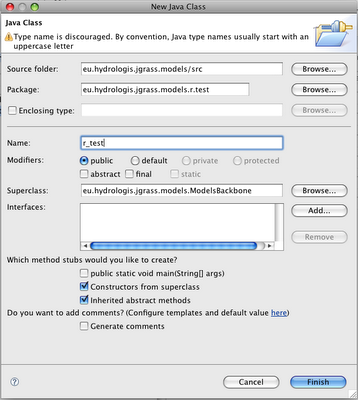
4) Assuming that you know what OpenMI is and that you know what you are doing, you are now going to implement the algorythm part. Click on the class and you will get a new java class wizard to help you. It will already propose you the needed class to extend and the proper actions.
The only thing you need to fill in are the package and the class name, but we had that already in step 3.
Pushing ok will create package and class template for you.
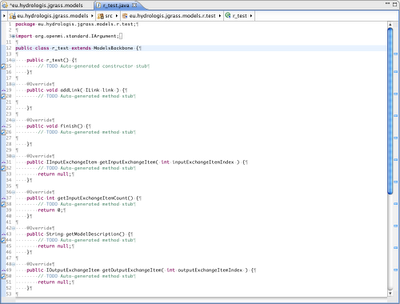
Well :), I know what you are thinking... but hell, no one ever told that OpenMI is an easy thing. I just say it is STANDARD, and that is GOOD!
So fill out your class in a proper way with the input and output items and at the next run of JGrass you will be able to use it in the console, since at startup Jgrass queries all openmimodel extension points and registers them with the console.
if you feel really lost, have a look at the many existing modules. For example h.pitfiller couls be a good one, since it just takes a map in input and creates one in output. Also use the mailinglist, if we can help you, we will.
1) assuming you created a plugin , open your plugin.xml with the Manifest-Editor

2) push the add button and in the upper filter part, type *openmi. Select the only entry left and push finish.

3) fill in some values for id, name, input and output items

4) Assuming that you know what OpenMI is and that you know what you are doing, you are now going to implement the algorythm part. Click on the class and you will get a new java class wizard to help you. It will already propose you the needed class to extend and the proper actions.
The only thing you need to fill in are the package and the class name, but we had that already in step 3.

Pushing ok will create package and class template for you.

Well :), I know what you are thinking... but hell, no one ever told that OpenMI is an easy thing. I just say it is STANDARD, and that is GOOD!
So fill out your class in a proper way with the input and output items and at the next run of JGrass you will be able to use it in the console, since at startup Jgrass queries all openmimodel extension points and registers them with the console.
if you feel really lost, have a look at the many existing modules. For example h.pitfiller couls be a good one, since it just takes a map in input and creates one in output. Also use the mailinglist, if we can help you, we will.
Thursday, August 14, 2008
Back from vacation. Profile is back with me.
Vacation did a good job. New energies for the rush towards Cape Town with new manuals and new JGrass. Lots of work to do though.
Finally I migrated the good old profile tool:
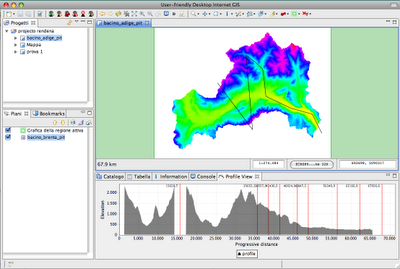
which obviously can also be used from console supplying coordinates:
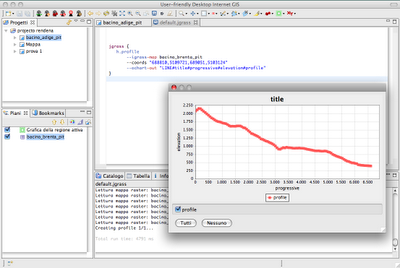
and if you just want the values of progressive and elevation, use a tablewriter (--otable) instead of the chartwriter (--ochart):
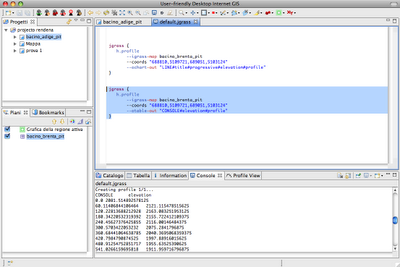
And obviously, for those who need to make a profile of an existing feature layer:
1) Select the feature that you want to have the profile from
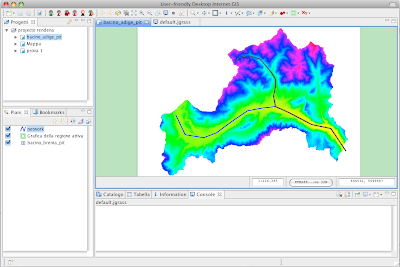
2) Go to the console view and instead of passing the --coords variable, just pass the featurelayer tag --iflayer-line:
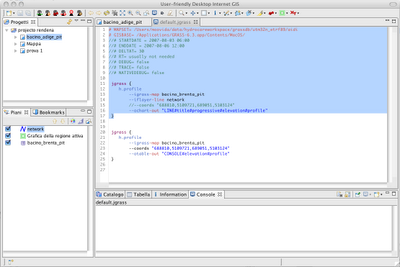
The result is the following:
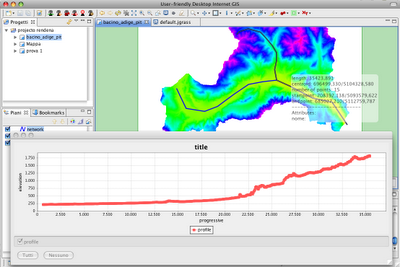
Seems to be ok.
Finally I migrated the good old profile tool:

which obviously can also be used from console supplying coordinates:

and if you just want the values of progressive and elevation, use a tablewriter (--otable) instead of the chartwriter (--ochart):

And obviously, for those who need to make a profile of an existing feature layer:
1) Select the feature that you want to have the profile from

2) Go to the console view and instead of passing the --coords variable, just pass the featurelayer tag --iflayer-line:

The result is the following:

Seems to be ok.
Thursday, April 10, 2008
How to create a command OR Presenting the actions-commands-console-openmi-uibuilder taskforce
You want to implement a new model/algorithm/command/action/do-something (MACAD) in JGrass?
Here more or less the full list of things to do. More or less is due to the fact that I assume you already know the JGrass or at least the Udig or at very least the Eclipse RCP development environment. Also some sort of OpenMI knowledge should be here. All in all I'm not sure how many will find this useful. Hmmm... I'm sure at least one of the chapters could be.
Why I'm doing this? Because next week I have to present a whole bunch of the JGrass stuff at the EGU and I need some docu. Enjoy :)
UPDATE: please note that now the steps 1 and 2 are done the clean rcp way throught extension points. Read here for more info.
1) Create your MACAD
My example will treat an OpenMI based model, i.e. h.pitfiller.
The model extends ModelsBackbone, which implements OpenMI's interface ILinkableComponent.
Create such a MACAD and implement the needed methods.
2) Tell the console engine that the new model is there
In the list of available MACADs add your new model, so that the engine knows that your MACAD exists.
The line looks like the selected in the image below:
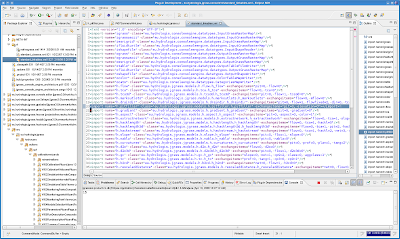
which basically tells us what the model's name and class are.
Also information is given about the arms the MACAD has. In this case 2 arm, which define the input elevation map and the output depitted map.
Note that at this point the model h.pitfiller can already be used in the JGrass console as
h.pitfiller --igrass-elevation elevation --ograss-pit pit
3) create a gui xml file definition for the MACAD (the UIBuilder of JGrass)
Create a file with the same name of the MACAD and xml extention and fill it with the following:
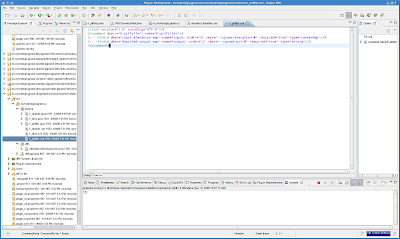
The first line will create a label of text descr, a textfield and a button that opens a map selection window.
The second creates a label of text descr and a textfield for the output map name.
When ok is pressed, the widget creates a command string build by the name of the command tag and the repr of the fileds tags, substituting the # with the user input:
h.pitfiller --igrass-elevation userinput --ograss-pit userinput
4) create an rcp action to launch the command
Once the gui definition is there, we need something to trigger the action.
Eclipse RCP's actionset comes to help us. I create a plugin inside which I keep all the gui for console commands and create an action. In the below image you can see the whole context with adifferent menus and action groups.
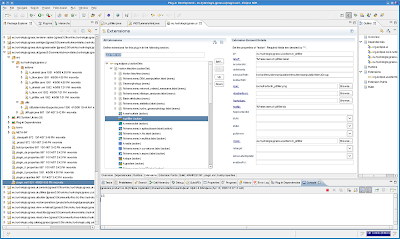
Please note the textfield class, inside which I put: eu.hydrologis.jgrass.ui.actions.h_pitfiller
The class MUST have the same name as the MACAD you want to create!
Let's create the class by clicking over the hyperlinked text class which will create the action class with all the needed implementation of interfaces and methods.
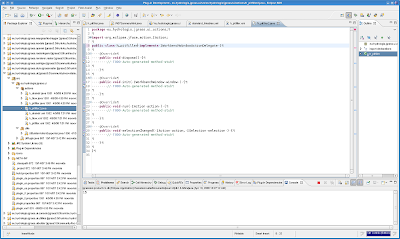
And now the same class with the needed changes:
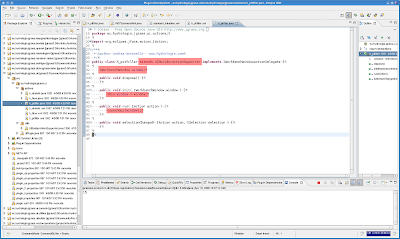
Apply the same changes and that is all. If you didn't do so, put the xml gui definition file inside the same package as the action class. Take a look at the screenshot above to see how it should look inside of the actions package.
5) try it out!
Launch JGrass and search in the menu bar your new item. In my case there are a lot, as I already have a whole bunch of organised MACADs in my configuration. However, here I go with pitfiller:
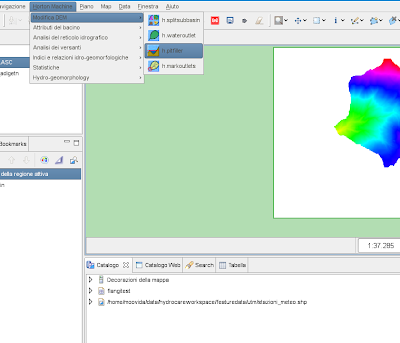
and the autogenerated gui looks like:
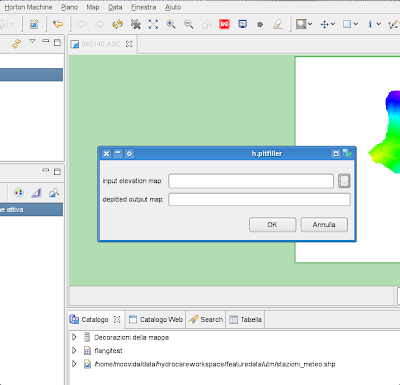
6) what happens when I click ok?
The uibuilder creates the commandline representation of the command line execution.
After that the command is passed to the console engine and a backtrace console window is attached to the process in order to deal with output and errormessages.
So the running h.pitfiller command looks like the following:
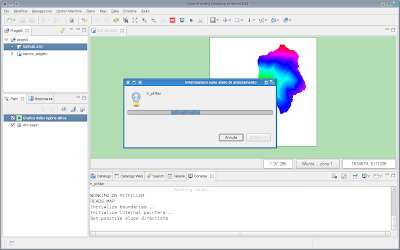
The same could have been done with any GRASS command, apart of the fact that you will not need to create the MACAD yourself :)
Alright, so let's see how to do the same with r.in.gdal, the GRASS native high power raster data import tool.
What you have to do different from before, is that when you create the action class, you need to tell the execution facility class that it is a GRASS command:
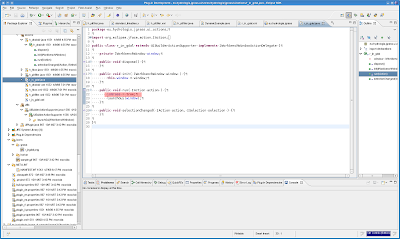
Create the xml file with the options you need:

and fully enjoy your new command:
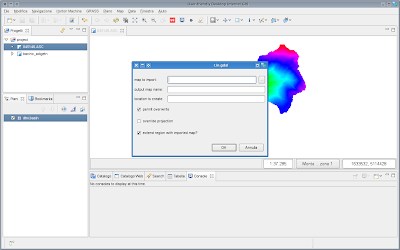
Here more or less the full list of things to do. More or less is due to the fact that I assume you already know the JGrass or at least the Udig or at very least the Eclipse RCP development environment. Also some sort of OpenMI knowledge should be here. All in all I'm not sure how many will find this useful. Hmmm... I'm sure at least one of the chapters could be.
Why I'm doing this? Because next week I have to present a whole bunch of the JGrass stuff at the EGU and I need some docu. Enjoy :)
UPDATE: please note that now the steps 1 and 2 are done the clean rcp way throught extension points. Read here for more info.
1) Create your MACAD
My example will treat an OpenMI based model, i.e. h.pitfiller.
The model extends ModelsBackbone, which implements OpenMI's interface ILinkableComponent.
Create such a MACAD and implement the needed methods.
2) Tell the console engine that the new model is there
In the list of available MACADs add your new model, so that the engine knows that your MACAD exists.
The line looks like the selected in the image below:

which basically tells us what the model's name and class are.
Also information is given about the arms the MACAD has. In this case 2 arm, which define the input elevation map and the output depitted map.
Note that at this point the model h.pitfiller can already be used in the JGrass console as
h.pitfiller --igrass-elevation elevation --ograss-pit pit
3) create a gui xml file definition for the MACAD (the UIBuilder of JGrass)
Create a file with the same name of the MACAD and xml extention and fill it with the following:

The first line will create a label of text descr, a textfield and a button that opens a map selection window.
The second creates a label of text descr and a textfield for the output map name.
When ok is pressed, the widget creates a command string build by the name of the command tag and the repr of the fileds tags, substituting the # with the user input:
h.pitfiller --igrass-elevation userinput --ograss-pit userinput
4) create an rcp action to launch the command
Once the gui definition is there, we need something to trigger the action.
Eclipse RCP's actionset comes to help us. I create a plugin inside which I keep all the gui for console commands and create an action. In the below image you can see the whole context with adifferent menus and action groups.

Please note the textfield class, inside which I put: eu.hydrologis.jgrass.ui.actions.h_pitfiller
The class MUST have the same name as the MACAD you want to create!
Let's create the class by clicking over the hyperlinked text class which will create the action class with all the needed implementation of interfaces and methods.

And now the same class with the needed changes:

Apply the same changes and that is all. If you didn't do so, put the xml gui definition file inside the same package as the action class. Take a look at the screenshot above to see how it should look inside of the actions package.
5) try it out!
Launch JGrass and search in the menu bar your new item. In my case there are a lot, as I already have a whole bunch of organised MACADs in my configuration. However, here I go with pitfiller:

and the autogenerated gui looks like:

6) what happens when I click ok?
The uibuilder creates the commandline representation of the command line execution.
After that the command is passed to the console engine and a backtrace console window is attached to the process in order to deal with output and errormessages.
So the running h.pitfiller command looks like the following:

The same could have been done with any GRASS command, apart of the fact that you will not need to create the MACAD yourself :)
Alright, so let's see how to do the same with r.in.gdal, the GRASS native high power raster data import tool.
What you have to do different from before, is that when you create the action class, you need to tell the execution facility class that it is a GRASS command:

Create the xml file with the options you need:

and fully enjoy your new command:

Friday, February 22, 2008
Say welcome to the Hydrologic Lady!
I want to signal the blog of the HydrologicLady.
On that site you will find a lot of useful tips and trick about how to use JGrass for environmental analyses, so if this is your field of interest, have a look at it.
She will also threat different interesting things to help, as for example this article about how to setup the GRASS environment inside JGrass and launch from within it GRASS commands.
On that site you will find a lot of useful tips and trick about how to use JGrass for environmental analyses, so if this is your field of interest, have a look at it.
She will also threat different interesting things to help, as for example this article about how to setup the GRASS environment inside JGrass and launch from within it GRASS commands.
Friday, February 8, 2008
Docs: How to understand JGrass's console engine - part IV, how to use it without JGrass?
I really want to drop a note for developers interested in this.
Alright, The JGrass console engine can be used without JGrass. All you need are the two console plugins from the JGrass package:
At that point lets code:
Set some options to the engine:
Note that the FileLocator.toFileURL stuff is needed only if inside an RCP application.
Now create the command you want to execute:
And execute it!
UPDATE
_________
I just created a class to use the console in standalone mode:
Alright, The JGrass console engine can be used without JGrass. All you need are the two console plugins from the JGrass package:
- eu.hydrologis.jgrass.console
- eu.hydrologis.jgrass.console.editor
At that point lets code:
              /*
               * prepare to use the console environment
               */
              PipedOutputStream out = new PipedOutputStream();
              PrintStream pStream = new PrintStream(out);
              JGrass console = ConsolePlugin.console();
              if (null == console) {
                              // throw something
              }
Set some options to the engine:
              ProjectOptions projectOptions = new ProjectOptions(pStream, pStream, pStream);
              PreferencesInitializer.initializeStartupProjectOptions(projectOptions);
              projectOptions.setOption(ProjectOptions.COMMON_GRASS_DATABASE, new File(
                      locationPath).getParent());
              projectOptions.setOption(ProjectOptions.COMMON_GRASS_LOCATION, new File(
                      locationPath).getName());
              projectOptions.setOption(ProjectOptions.COMMON_GRASS_MAPSET, mapsetName);
              projectOptions.setOption(ProjectOptions.CONSOLE_COMPILE_ONLY, new Boolean(false));
              projectOptions.setOption(ProjectOptions.CONSOLE_ASYNC_MODE, new Boolean(false));
              URL rtUrl = Platform.getBundle(ConsolePlugin.PLUGIN_ID).getResource("rt"); //$NON-NLS-1$
              String rtPath = null;
              try {
                  rtPath = FileLocator.toFileURL(rtUrl).getPath();
              } catch (IOException e) {
                  HydrocarePlugin.log("HydrocarePlugin problem", e);  //$NON-NLS-1$
                  e.printStackTrace();
                  return;
              }
              projectOptions.setOption(ProjectOptions.CONSOLE_DIRECTORY_INCLUDE,
                      new String[]{rtPath});
Note that the FileLocator.toFileURL stuff is needed only if inside an RCP application.
Now create the command you want to execute:
String command = "g.region -p";
And execute it!
console.dispatch(projectOptions, command);
UPDATE
_________
I just created a class to use the console in standalone mode:
/**
* Standalone console engine
*
* @author Andrea Antonello - www.hydrologis.com
*/
public class JGrassConsole {
private final String grassDbPath;
private final String locationName;
private final String mapsetName;
private final String rtPath;
private boolean doDebug = false;
private String gisbase = "/"; //$NON-NLS-1$
public JGrassConsole(String grassDbPath, String locationName,
String mapsetName, String rtPath, String cmd, boolean debug,
String grass) {
this.grassDbPath = grassDbPath;
this.locationName = locationName;
this.mapsetName = mapsetName;
this.rtPath = rtPath;
this.doDebug = debug;
if (grass != null) {
gisbase = grass;
}
/*
* prepare to use the console environment
*/
PrintStream outStream = new PrintStream(System.out);
PrintStream errStream = new PrintStream(System.err);
JGrass console = (JGrass) new ConsoleEngine();
if (null == console) {
// throw something
}
ProjectOptions projectOptions = new ProjectOptions(outStream,
outStream, errStream);
initialize(projectOptions);
console.dispatch(projectOptions, cmd);
}
/**
* @param args
*/
@SuppressWarnings("nls")
public static void main(String[] args) {
String grassDbPath = null;
String locationName = null;
String mapsetName = null;
String rtPath = null;
String cmd = null;
String grass = null;
boolean debug = false;
for (String arg : args) {
System.out.println(arg);
if (arg.startsWith("-db")) {
grassDbPath = arg.split("=")[1];
}
if (arg.startsWith("-loc")) {
locationName = arg.split("=")[1];
}
if (arg.startsWith("-maps")) {
mapsetName = arg.split("=")[1];
}
if (arg.startsWith("-rt")) {
rtPath = arg.split("=")[1];
}
if (arg.startsWith("-cmd")) {
cmd = arg.split("=")[1];
}
if (arg.startsWith("-deb")) {
debug = true;
}
if (arg.startsWith("-grass")) {
grass = arg.split("=")[1];
}
}
if (grassDbPath == null || locationName == null || mapsetName == null
|| rtPath == null || cmd == null) {
System.out
.println("USAGE: -db=-loc= -maps= -rt=
Subscribe to:
Posts (Atom)