Showing posts with label vector. Show all posts

Tuesday, October 20, 2020

SMASH 1.6.0 is out - all the love for geopackage

A couple of days ago we released SMASH 1.6.0 to the stores. So why is this post coming only now?

Because Google store changed its policy for apps that use background location and is making me life impossible to get a release to the store. Since I am still waiting to understand why I am doing what wrong, I decided to make this post anyways and place the apk of the android version as a download.

Basically this release brings out all the love we have for the geopackage format.

Geopackage geometry editing

We finally have a first version of SMASH with vector editing. Last week I shared a video in which editing has been showcased. Well, not much has changed since that day, so to have a look at editing, just have a look at this. I guess it is better than 500 screenshots I would place here below  :-)


Geopackage export

We have been thinking a lot about the geopackage format. We were tempted to migrate the internal geopaparazzi/SMASH format to geopackage directly, but then we decided it would be better to keep the current format to maintain backward compatibility and compatibility with geopaparazzi.

Since many people see Geopackage also as a good "transfer" format from mobile to PC, we added a new export option. It is now possible to export the complete survey as a single geopackage with everything in it.


A minor change (but one I like) is that the GPS notification message on Android is dynamic. It shows a lot of nice information about the current state of the GPS, position and logging status.


Where to download for Android?

Until the issue with the google store is not sorted out, please get your copy of SMASH 1.6.0 HERE.


Sunday, December 9, 2012

Geopaparazzi 3.4.0 is out! Please welcome the Spatialite brothers... and NFC support

At the begin of November Sandro Furieri, known for being the father of the Spatialite project (but also known for being our very personal presidential Fury of the Italian GFOSS association), wrote me an email about a release of spatialite for android.

Well, I was in a real busy moment and struggeling with the preparation of the presentation of the upcoming GFOSS day, the Osgeo Italian chapter gathering of the tribes.

Since I was doing a presentation about a history of the mobile trend, particularly related to Android and GFOSS software, I had to do something. So I spent soem night to integrate spatialite in geopaparazzi. Well, during the presentation I gave at the conference:

I only showed a small joke screenshot, where geopaparazzi was dialoging with Fury to do some transformations (see slide 50).

But from that moment I could not stop to think about a raster+vector format for data exchange between different operating systems and devices.

With Spatialite it would be possible to finally overlay not only points and simple lines, but also polygons and large datasets. The spatial index would help, i knew it would.

So we started to implement a new layer in geopaparazzi: the spatialite dataset layer.

An it seemed to work nicely with the Natural Earth datasets.


As a sidenote, since the map viewport in geopaparazzi is bound to use OSM mercator, Spatialite has to reproject the original dataset into that one.


This also produced a short developer tutorial which can be found here.


We tested this new spatialite enabled version on different devices and out in the Finnish flat/wetlands when checking back watershed boundaries extracted through the JGrasstools libraries (well, that will most probably be the next story). It works incredibly well even if it is not really optimized yet, which is why we decided to release it already.

This is how it looked like when we overlayed on a scanned Finnish orienteering map the results of our hydrologic/hydraulic study: old, new and extracted watershed boundaries and channel lines.


Ah yes, did you notice the new icon under the zoom buttons? That is a query button. Through that one you can draw query boxes on the map and the attrubutes of the intersecting features will pop-up:


Well, this opens up a whole new world for geopaparazzi and mobile development in general. And it will even more when the rasterlite part of Spatialite will be supported for Android!

A big thank goes to Sandro for helping out optimising the spatial queries and for fostering the development through realtime support.

Sure, this is the major news here, but there is one more huge addition to this release. We now support reading of RFID tags through NFC and bluetooth devices. For this feature an activity has been exposed for developers, but normal users can access this feature simply through the forms:


You can enable the tag reader widget and you will get a button, which, once pushed, will open this scanner activity:


The nice thing about this is that it is able to scan tags both through NFC and a bluetooth device connected to geopaparazzi.
Once you see your tag id scanned, push ok and the form textfield will be filled with the tag id.

One downside of the addition of Spatialite to the game, is that adding the native libraries and necessary stuff, brought geopaparazzi from less than 2 megabytes to almost 9 megabytes. We figured that people would not care particularly, since the added value is huge.

Well, I think that is all for this release. Enjoy!


Saturday, October 10, 2009

Some dxf/dwg screens

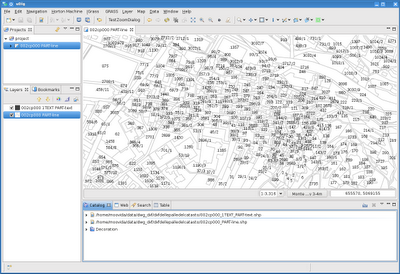
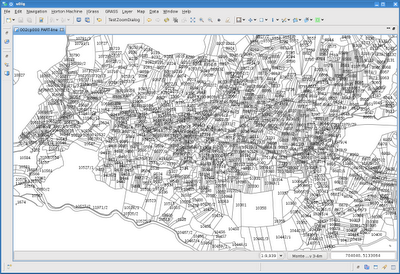
Just some screens taken from the import of dxf and dwg files.
Note that the dwg files are badly supported, they cover < Acad2000 and I think not every case..

Cadastral files are one good example that here is delivered only in dxf format. Seems to work well finally:


And an example of dwg, where due to the complexity of the different dwg internal types, I preferred to create 3 shapefile for evey type of data and set the layer name as an attribute, so one can select-copy/export the features to other layers.


Much has still to be tested. If you want your files tested, please send them to me, I would be glad to fix problems if I am able.

Friday, October 9, 2009

Dxf (and Dwg) in JGrass?

In our engineers job we get in tought much too often with dwg and dxf data. And much too often I told myself (and was told by my colleague Silli) that I should finally port the dxf/dwg import tool that the old JGrass borrowed from the gvSig community.

And here is finally the first step. The dxf import:

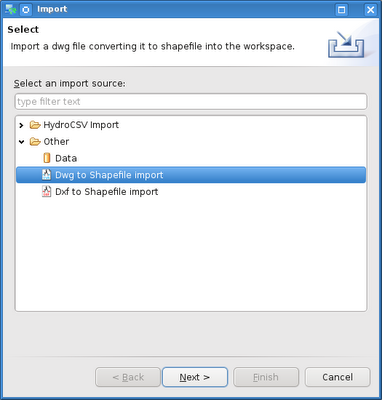
1) got to the usual import menu and find the dxf/dwg import


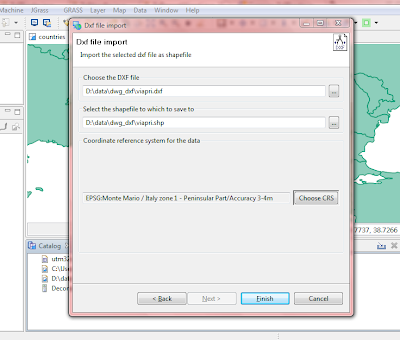
2) choose dxf import and insert the dxf file to be imported and the new shapefile to be created. Since dxf has no idea about projection, choose also a projection for the imported data.


3) push finish and wait. One layer will be created for every internal layer of the dxf file, with the data type that better suits the jts type. In this case I only had a road network:


Now have to test other types and files. Then it's dwg funtime (I hate those proprietary formats!). And then it all goes into uDig. Still have to think how though, since the license of this plugin has to stay GPL because of its prior licensing. Hmmmm....

Thursday, August 28, 2008

The rasterizing tools are back in town

The v.to.rast tool is back:


jgrass {
v.to.rast
--ishapefile-in "/Users/moovida/data/hydrocareworkspace/featuredata/utm/bacino_brenta.shp"
--ograss-out brenta_polygons
--fieldname "netnum"
}


Executing that converts from:


to that:


In this case conversion is based on the value in a field of the shape and on polygons. Obviously it works for all the geometry types.

Wednesday, May 28, 2008

How to convert a csv file to shapefile

Imagine you need to have a shapefile made of some points you have around from a sampling.
You want to create a shapefile out of it.

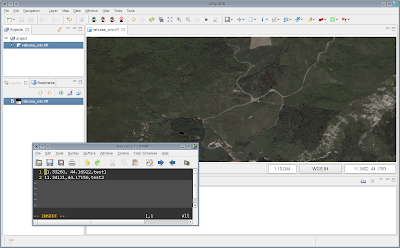
step 1: create a simple CSV file with the coords to add an attribute:

11.33260, 44.16922,test1
11.34121,44.17156,test2


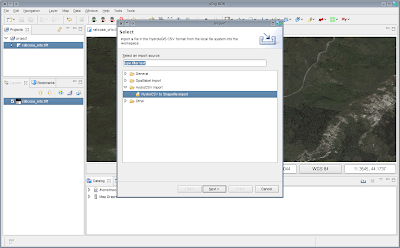
step 2: go under the file menu and select import


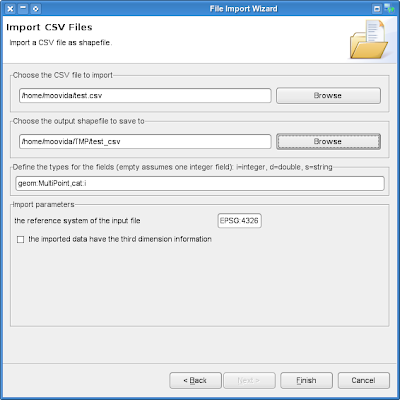
step 3: fill in the wizard parameters
  • the csv file to convert
  • the output shapefile
  • the description of the shapefile. The first is the geometry, which can be of 2 coordinates or 3 (need to check the box for that). Then every other attribute needs to have exactly one equivalent in the csv file
  • the coordinate reference system


step 4: press finish and drag the new created shape in the map

Saturday, May 3, 2008

How to create a feature for an empty Udig layer

Assume you have a new created layer in your Udig workspace. Now you want to programmatically add a feature to it by just knowing its coordinates.

You will need to create a feature that adapts to the schema you layer will have.
I was used to take a feature from the layer, duplicate it and change attributes and geometry in the past. Oviously this isn't very nice and I finally found the limitation. So here is what to do if you have no feature to copy from.


FeatureSource source = layer
.getResource(FeatureSource.class, new NullProgressMonitor());
if (source == null) {
throw new LayerNotSupportedException(
"This layer is not supported, only feature layers are supported.");
}
// get the featurecollection from the layer, even if empty
FeatureCollection selectedFeatureCollection = source.getFeatures();
/*
* in this case the feature has to be created on the blueprint of the layer's
* features, asking the user for the new attributes to use. Note that getFeatureType
* here doesn't supply hwat you want.
*/
FeatureType featureType = selectedFeatureCollection.getSchema();
/*
* try to create default features where possible
*/
Object attributes[] = DataUtilities.defaultValues(featureType);
/*
* geometry is not created as default, so add yours
*/
attributes[0] = gFac.createPoint(new Coordinate(0.0, 0.0));
featureToUse = featureType.create(attributes);

Feature is created.

Wednesday, January 23, 2008

How to really create a ShapeFile

I have been struggling around for a very long while and went through many different methods of creating a shapefile. Thanks to Jody Garnett and the geotools team this has now come to a (temporary) end. Adapted from some mailinglist thread and this page:


// Create the DataStoreFactory
FileDataStoreFactorySpi factory = new IndexedShapefileDataStoreFactory();

// Create the file you want to write to
File file = null;
if (pathToFile.toLowerCase().endsWith(".shp")) {
file = new File(pathToFile);
} else {
file = new File(pathToFile + ".shp");
}
// Create a Map object used by our DataStore Factory
// NOTE: file.toURI().toURL() is used because file.toURL() is deprecated
Map map = Collections.singletonMap("shapefile url", file.toURI().toURL());

// Create the ShapefileDataStore from our factory based on our Map object
ShapefileDataStore myData = (ShapefileDataStore) factory.createNewDataStore(map);

// Tell this shapefile what type of data it will store
// Shapefile handle only : MultiPoint, MultiLineString, MultiPolygon
FeatureType featureType = DataUtilities.createType("some name", fieldsSpec);
// where fieldsSpec is a string description of the contents of the shapefile,
// somthing like "geom:MultiPoint,name:String,id:Integer,description:String


// Create the Shapefile (empty at this point)
myData.createSchema(featureType);

// Tell the DataStore what type of Coordinate Reference System (CRS) to use
myData.forceSchemaCRS(crs);

FeatureCollection collection = FeatureCollections.newCollection();

Object[][] attr = attributes;
// where attributes is an array of arrays (sometimes called matrix,
// but it is easier to understand in this context :)) of the attributes
// of the future shapefile, also containing in the first array the geometries
try {
for( int i = 0; i < record =" new" j =" 0;" featurename =" myData.getTypeNames()[0];" transaction =" null;" store =" null;" transaction =" new" store =" (FeatureStore)">

Tuesday, January 15, 2008

How to use nice windows to select maps, layers, etc in JGrass

In JGrass with the need to often select raster and vector maps from within windows, dialogs and so on, and because of the need to have particular informations about Locations and Mapset given to the executed algoritms, we decided to create a set of widgets to do so.

They are really easy to call and give back the list of the selected resource:


JGRasterChooserDialog tree = new JGRasterChooserDialog();
tree.open(elevationGroup.getShell(), SWT.SINGLE);
JGrassMapGeoResource selected = tree.getSelectedResources().get(0);
String layerName =selected.getTypeNames()[0];


Which looks like the following two images, depending on whether you want to pick up the resource from the loaded layers in the project or also from the resources loaded in the catalog:

Here I loaded I GRASS raster map,


and here all the maps in the locations that is loaded in the catalog are seen.


The same applies for the featuresources:


FeatureChooserDialog tree = new FeatureChooserDialog();
tree.open(reachShapeGroup.getShell(), SWT.SINGLE);
DataStore selected = tree.getSelectedResources().get(0);
String layerName =selected.getTypeNames()[0];


and catalog.


Fairly easy, isn't it? :)

Sunday, January 13, 2008

How to rasterize a polygon in JGrass - the quick and dirty scan line algorithm

After trying for a while to rasterize polygons by quering every point of the raster matrix to be inside of the given polygon, Martin Davis pointed me out to the scan line algorythm.

To make a quick and dirty implementation of it with the support of the JTS suite was fairly easy in JGrass:


GeometryFactory gFactory = new GeometryFactory();
int rows = active.getRows();
int cols = active.getCols();

for( int i = 0; i < rows; i++ ) {
for( int j = 0; j < cols; j++ ) {
if (rasterToMap != null) {
raster.setValueAt(i, j, JGrassConstans.defaultNovalue);
} else {
raster.setValueAt(i, j, 0.0);
}
}
// do scan line to fill the polygon
LineString line = gFactory.createLineString(new Coordinate[]{
rowColToCenterCoordinates(active, i, 0),
rowColToCenterCoordinates(active, i, cols - 1),});
if (polygon.intersects(line)) {
Geometry internalLines = polygon.intersection(line);
Coordinate[] coords = internalLines.getCoordinates();
for( int j = 0; j < coords.length; j = j + 2 ) {

int[] startcol = coordinateToNearestRowCol(active, coords[j]);
int[] endcol = coordinateToNearestRowCol(active, coords[j + 1]);

if (startcol == null || endcol == null) {
// vertex is outside of the region, ignore it
continue;
}
/*
* the part in between has to be filled
*/
for( int k = startcol[0]; k <= endcol[0]; k++ ) {
if (rasterToMap != null) {
raster.setValueAt(i, k, rasterToMap.getValueAt(i, k));
} else {
raster.setValueAt(i, k, 1.0);
}
}
}
}
}


Where raster and rasterToMap are two RasterData objects that simply wrap a double[][] matrix. Raster is an empty matrix to be filled, whereas rasterToMap is a map that can be used to "cut" out the data inside the polygon area to be put in the matrix to be filled.

As I said, quick and dirty :)