Sunday, August 31, 2008

How to do calculations on maps: asking GRASS for help - part II

Perhaps one of the most used tools in GRASS for those that work with rasters, is the r.mapcalc. This tool gives you a powerful way to do algebra on raster maps.

Let's have a look at it wearing the JGrass gui.

First search the tool in the raster tools:


Selecting the tool you will get the calculator window:


As you can see, there is an area into which to put the equation you want to do on the maps. The equation supports a minimal syntax highlighting. Important is the fact that existing maps are written in bold and italics, so if they are not, probably you are making a typo error and you can check the name of the map before executing it.

Also there is a resulting map text field, which represents the name of the created map.

Another nice thing is the combobox that keeps track of the launched commands, also throught the JGrass session. The last 20 entries are saved over time:


In the first dialog the equation is the following:
if(bacino_chiese_pit <>2500, bacino_chiese_pit , null())
which translated means:
In the pixels of the map, in which the value is <> 2500 put the original value of the map, else put a novalue.

This is a very simple example, this tools can be really exploited with nested commands and strange stuff.

And the result is as expected:


Enjoy!

How to create a contour map: asking GRASS for help - part I

As you probably know, JGrass can execute GRASS command, which makes it a really powerfull funbox.

So what if I want to extract a shapefile of contour lines from a DTM?


def outputName = "contours"
def outFolder = "/Users/moovida/TMP/"
def inputDem = "bacino_chiese_pit"
grass r.contour --o input=$inputDem output=$outputName step=250
grass v.out.ogr input=$outputName type=line dsn=$outFolder olayer=$outputName layer=1 format=ESRI_Shapefile
grass g.remove vect=$outputName

And we go from:


through:


to the needed layer:

Geosolutions coverage tools in Udig / JGrass

It is some time now that the Geo-solutions guys created at geotools level tools for tiling, mosaicing and creating overviews of images.

It was really time to have them in udig to use them on those images that trouble us with memory overload.

I have thought a thousand of times about creating a wizard at Udig level, so it could be in the standard Udig, but in the end I brought it as OpenMI based module into JGrass for several small reasons, but one main reason. As JGrass module it is scriptable and it also gets almost automagically a gui. Also the scripts can be launched with the console in standalone mode on serverside. So after a small discussion with Simone of Geosolutions we decided for them to be a JGrass module.

That means that to use those for now you will have to load the JGrass plugins.

So, what are those coverage tools?
Imagine a schenario of the following kind: you have 25 geotiffs, that take one hour to load the first 3 of them and than freezes udig and at some point breakes completely.

This is probably due to the fact that those geotiffs do not have overviews.
Now you can solve it from Udig with the following:


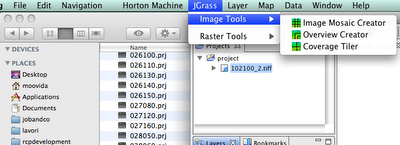
Choose the Overview creator and you will get a dialog:

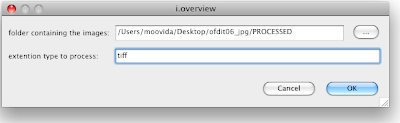
enter the folder and the extention of your images and press ok. The overview tool takes a hell of a time and for that hell of a time on my pc it takes all resources. And I mean ALL. Launch it best before going to sleep.

After the creation of overviews, your geotiffs should load really fast and without sucking your pc memory. Now I get really quickly my images loaded:


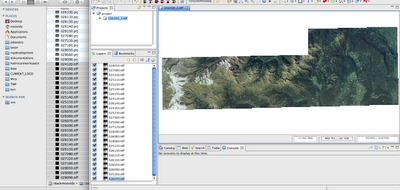
Well, what we do not like, is that we have 25 layers with one image each.

That is why in the coveragetools there is also an Image Mosaic Creator. Launch it:


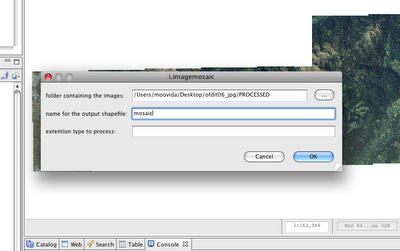
Since the extension defaults to tiff, I can omit it.
After a few seconds the shapefile is created and if I load it, the result is the following:


Two main differences:
1) the layer is just the one of the shapefile that loads all the geotiffs (great!!)
2) the background of missing tiles is black (ugly)

There is also a third tool, the Image tiler, which splits an image into smaller pieces of the dimension the user supplies.


Alright, as promised for a bit more advanced users the same commands can be accessed from the console. In that mode it will be also possible to tweak some flags and values, which in the gui are set to default.

The scripts look like that:


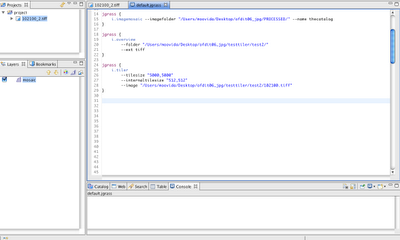
This is really a nice set of tools for all those that do not have much memory.

The downside of the tools is that they work with the new geotools and therefore only with the new development version. But hey, in Cape Town we will try to use that one, so you will be able to get your Udig with all the tools in it by next month.

Friday, August 29, 2008

New JGrass tools to query and correct raster maps

d.what.rast

With JGrass under the info tools in the gui you can find the "Query tool" or in GRASS language d.what.rast.

By selecting one or more maps you are able to query a particular coordinate to get the raster value for that, together with some useful position info.


Now the same can be achieved from the console with more than one coordinate in order to get a list of coordinates and values to be used in the script:


jgrass {
$values = d.what.rast
--igrass-in bacino_brenta_pit
--coords "692055.62,5103501.69,694218.62,5105772.84"
--printrowcols "true"
--otable-out "UITABLE#x#y#value#row#col"
}

will gain:


r.correct

In the same info icon menu you can find the Correct tool, or better known as r.correct.
Even if some of you might find it useless, some of us will need it for everyday's work. It gives the possibility to correct manually pixel values of a raster map.

For example here I have a map with a river (which pixels contain the channelnumber) network over an elevation model map. Note that the river map has novalues were there is no river.

If I click with the r.correct tool on a point on the river network, a dialog with a table containing the raster values opens and I am able to change those values and save the map (overwriting the old or creating a new one).

Note also that you have buttons all around the table that let you navigate the raster, if there are other values around you want to change.

The same of above by image:

1) click the point on the network in the area you want to change:


2) change the value of the pixel you want to change. In this case let's just split the network arm from the main network. Split means set a value to novalue, which by default is -9999.0:


3) save and hit refresh to redraw the map. The river is split:

Thursday, August 28, 2008

The rasterizing tools are back in town

The v.to.rast tool is back:


jgrass {
v.to.rast
--ishapefile-in "/Users/moovida/data/hydrocareworkspace/featuredata/utm/bacino_brenta.shp"
--ograss-out brenta_polygons
--fieldname "netnum"
}


Executing that converts from:


to that:


In this case conversion is based on the value in a field of the shape and on polygons. Obviously it works for all the geometry types.

Wednesday, August 27, 2008

How to read a grass raster and script on it

I just added a r.read command to the console commands list. Currently it can read grass raster.

The console scripting code:

jgrass {
$map = r.read --igrass-in bacino_brenta_pit --ograss-out *
}

rasterData = map.getJGrassRasterData();

rows = rasterData.getRows();
cols = rasterData.getCols();

println rows + " " + cols;

rows--;
cols--;
for (i in 0..rows) {
for (j in 0..cols){
print rasterData.getValueAt(i, j) + " ";
}
println "";
}


Please note that groovy really doesn't need type declaration.


Well on the raster data you could do some nice calculus:

How to add a new piece to the console

For several good resaons I wanted to teach the JGrass Console to speak groovy.
Well, since groovy supports java syntax, I thought this would go on the fly, but I was very, very wrong.

Nevertheless the speed of Groovy in handling files and many other things forced me to get my fingers dirty in the console compiler system, an IT magic created in coorperation with Andreas Hamm last year.

So the problems found were basically 3:
1) java blocks without labels are not supported in groovy, because of their ambiguity with closures
2) the direct assignment array construct is not supported: String[] str = {"a", "b"};
3) the Classloader works differently from the one of beanshell, and we don't see the needed classes

So Hamm and I spent an evening together in chat to make me understand how the internals of the console work.
And here I want to share that with you, by showing you how I solved problem 2, which contains also 1.It is not for the weak of heart (also because the code snippets are not well formatted), but believe me, after a starting desperation, I had quite some fun :)

0) identification of the problem

Groovy doesn't support an array creation like:
String[] __arg_v = {"a", "b" };

we need to change it to:
Argument[] __arg_v = new Argument[2];
__arg_v[0] = "a";
__arg_v[1] = "b";


and this should be general also to other types of arrays.

The problem in this case that no Abstract Syntax Tree operator was available to deal with array and therefor a new piece of syntac had to be created.

Step by step this was done like that:

1) add a new enumeration type to eu.hydrologis.jgrass.console.core.runtime.analysis.ASTs.java

In this case I added:

/**
*
* The identifier of an operator of the array keyword for the creation of an
* array e.g., "array[2]; array[0] = string1; array[1] = string2;
*
*
* @see eu.hydrologis.jgrass.console.core.runtime.nodes.AST_while
*/
AST_ARRAY(null, "ARRAY"); //$NON-NLS-1$


2) add a new class in eu.hydrologis.jgrass.console.core.runtime.nodes

ex. AST_array with a Default constructor and a Copyconstruktor

public final class AST_array extends AbstractAST implements AST {

// Construction
/**
*
* Constructs this object.
*
*/
public AST_array() {

super(ASTs.AST_ARRAY.expression(), ASTs.AST_ARRAY.annotation(), ASTs.AST_ARRAY);
} // AST_array

/**
*
* Constructs this object with the specified operands.
*
*
* @param operands - can be null or either a single operand or a list of operands.
*/
public AST_array( AST... operands ) {

super(ASTs.AST_ARRAY.expression(), ASTs.AST_ARRAY.annotation(), ASTs.AST_ARRAY, operands);
} // AST_array
} // AST_array


3) add the grammar to the NativeML4j

Add the Argument array type:
final SYM_type_array __typedef_argument = new SYM_type_array("Argument"); //$NON-NLS-1$

Search for the part in which the proper child is added in the method __native_model.

Before:
Argument[] args = {arg1, arg2}

Created by:
new AST_expression(
new AST_variable_definition(
new AST_type(__typedef_argv.type()),
new AST_identifier(__variable_argv),
new AST_assign_statement(
new AST_block(
__parameter_definition(
symtable,
operator))))),

Now we need an array, which changes things to the following:

new AST_variable_definition(
new AST_type(__typedef_argv.type()),
new AST_identifier(__variable_argv),
new AST_assign_statement(
new AST_array(
__parameter_definition(
symtable,
operator),
new AST_type(
__typedef_argument.type()),
new AST_identifier(__variable_argv))))

note how to the AST_array we pass the normal operators throught __parameter_definition, but also an AST_type, which will tell us at generation time which class to use for the array creation and also the name of the variable needed. The last said is needed to create the different array elements:

varname[0] = ...
varname[1] = ...
...


4) add the grammar to the JavaML4j

Exactly the same way done for grass models, we proceed for java models.

In __java_model I change the expression that was creating arrays the wrong way for groovy:

new AST_block(
__argument_definition(
( APT_argument_definition
)operator.argument_defs()
)
)

and change it with:

new AST_array(
__argument_definition((APT_argument_definition) operator
.argument_defs()),
new AST_type(__typedef_argv.type()),
new AST_identifier(__variable_argv))


The same is needed in __model_input and __model_output.


5) In eu.hydrologis.jgrass.console.core.runtime.compiler.AbstractML4j.java add the case.

In the method generate, crate a case based on the enum of 1) and create the proper generation of code there:


case AST_ARRAY:
/*
* this should be a set of strings (also concatenated) divided by commas
*/

targetCode.append("new "); //$NON-NLS-1$

AST typeChild = null;
AST commaChild = null;
AST variableChild = null;
for( int i = 0; i <> child = op.getChild(i);
if (child.identifier().annotation().equals(ASTs.AST_TYPE.annotation())) {
typeChild = child;
}
if (child.identifier().annotation().equals(ASTs.AST_COMMA.annotation())) {
commaChild = child;
}
if (child.identifier().annotation().equals(ASTs.AST_IDENTIFIER.annotation())) {
variableChild = child;
}
}
if (typeChild != null && commaChild != null && variableChild != null) {
int nums = commaChild.size();
String arrayString = typeChild.expression();
arrayString = arrayString.substring(0, arrayString.length() - 1) + nums + "]";
targetCode.append(arrayString).append(";\n"); //$NON-NLS-1$

// now the arrays
String varName = variableChild.expression();
for( int i = 0; i < j =" 0;"> child = commaChild.getChild(i);
generate(indentCount + 1, child, targetCode);
targetCode.append(";\n"); //$NON-NLS-1$
}
}

break;


The result?
Now the JGrass Console can use Beanshell and Groovy by defining the language as a session setting (in the settings lines that start with # in the script).

But hei, images tell more than thousand words:


Go, closure, go!!!

Tuesday, August 26, 2008

JGrass now ships with OpenMI 1.4

Since I will attend the next OpenMI meeting, I am in fact playing a lot with it in this time.

Today I migrated JGrass to the new 1.4 openMi SDK.

For those that didn't find the new java version of openmi, here it goes from svn.
This is the official OATC version:

http://openmi.svn.sourceforge.net/viewvc/openmi/branches/OpenMI-1.4.1-de
v/MyOpenSource/Alterra/


Just for those that do not know. For JGrass we use a modified version that we make support the OGC SimpleFeature model and currently the JGrass rasters. We are working to get the OGC standard also for rasters in it.


Find infos about OpenMI here.

Friday, August 15, 2008

OpenMI "exposed" in JGrass

I finally took the time to understand how an extension point is created. Well, now a first step is done. I wanted to be able to serve JGrass and GRASS command through rcp extention points and be able to configure in that one also its GUI and menu entries, but for now what works is the creation of the command and its registration to the console engine. The gui stuff will also be there at some point. But for now let's have a look at the new way to create OpenMI enabled JGrass modules.

1) assuming you created a plugin , open your plugin.xml with the Manifest-Editor


2) push the add button and in the upper filter part, type *openmi. Select the only entry left and push finish.


3) fill in some values for id, name, input and output items


4) Assuming that you know what OpenMI is and that you know what you are doing, you are now going to implement the algorythm part. Click on the class and you will get a new java class wizard to help you. It will already propose you the needed class to extend and the proper actions.
The only thing you need to fill in are the package and the class name, but we had that already in step 3.


Pushing ok will create package and class template for you.


Well :), I know what you are thinking... but hell, no one ever told that OpenMI is an easy thing. I just say it is STANDARD, and that is GOOD!

So fill out your class in a proper way with the input and output items and at the next run of JGrass you will be able to use it in the console, since at startup Jgrass queries all openmimodel extension points and registers them with the console.

if you feel really lost, have a look at the many existing modules. For example h.pitfiller couls be a good one, since it just takes a map in input and creates one in output. Also use the mailinglist, if we can help you, we will.

Thursday, August 14, 2008

Back from vacation. Profile is back with me.

Vacation did a good job. New energies for the rush towards Cape Town with new manuals and new JGrass. Lots of work to do though.

Finally I migrated the good old profile tool:


which obviously can also be used from console supplying coordinates:


and if you just want the values of progressive and elevation, use a tablewriter (--otable) instead of the chartwriter (--ochart):


And obviously, for those who need to make a profile of an existing feature layer:
1) Select the feature that you want to have the profile from


2) Go to the console view and instead of passing the --coords variable, just pass the featurelayer tag --iflayer-line:


The result is the following:


Seems to be ok.